The “Administration” option in TURBOARD is only available to users with Admin permissions (Super Admin Users).
From TURBOARD’s main sidebar navigation menu > Administration option, the super admin user can apply configurations, settings and determine preferences to control how TURBOARD platform shall generally work and look like, such as the general layouts (logos, themes), users’ permissions, system configuration settings.
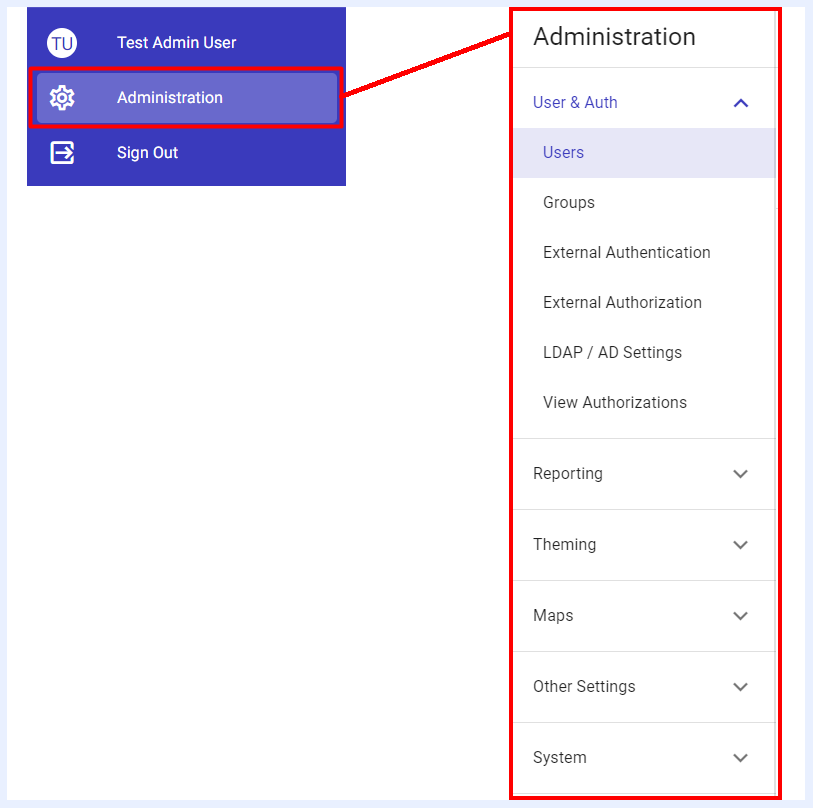
User & Auth
Under this section, TURBOARD users are added/edited, their permissions to apply the different actions in TURBOARD are determined, login credentials and other authentication and authorization settings are configured.
Users
This section allows the Admin user to add new users and give permissions, to edit existing users’ permission and configure user-related other details.
How to add a user in TURBOARD?
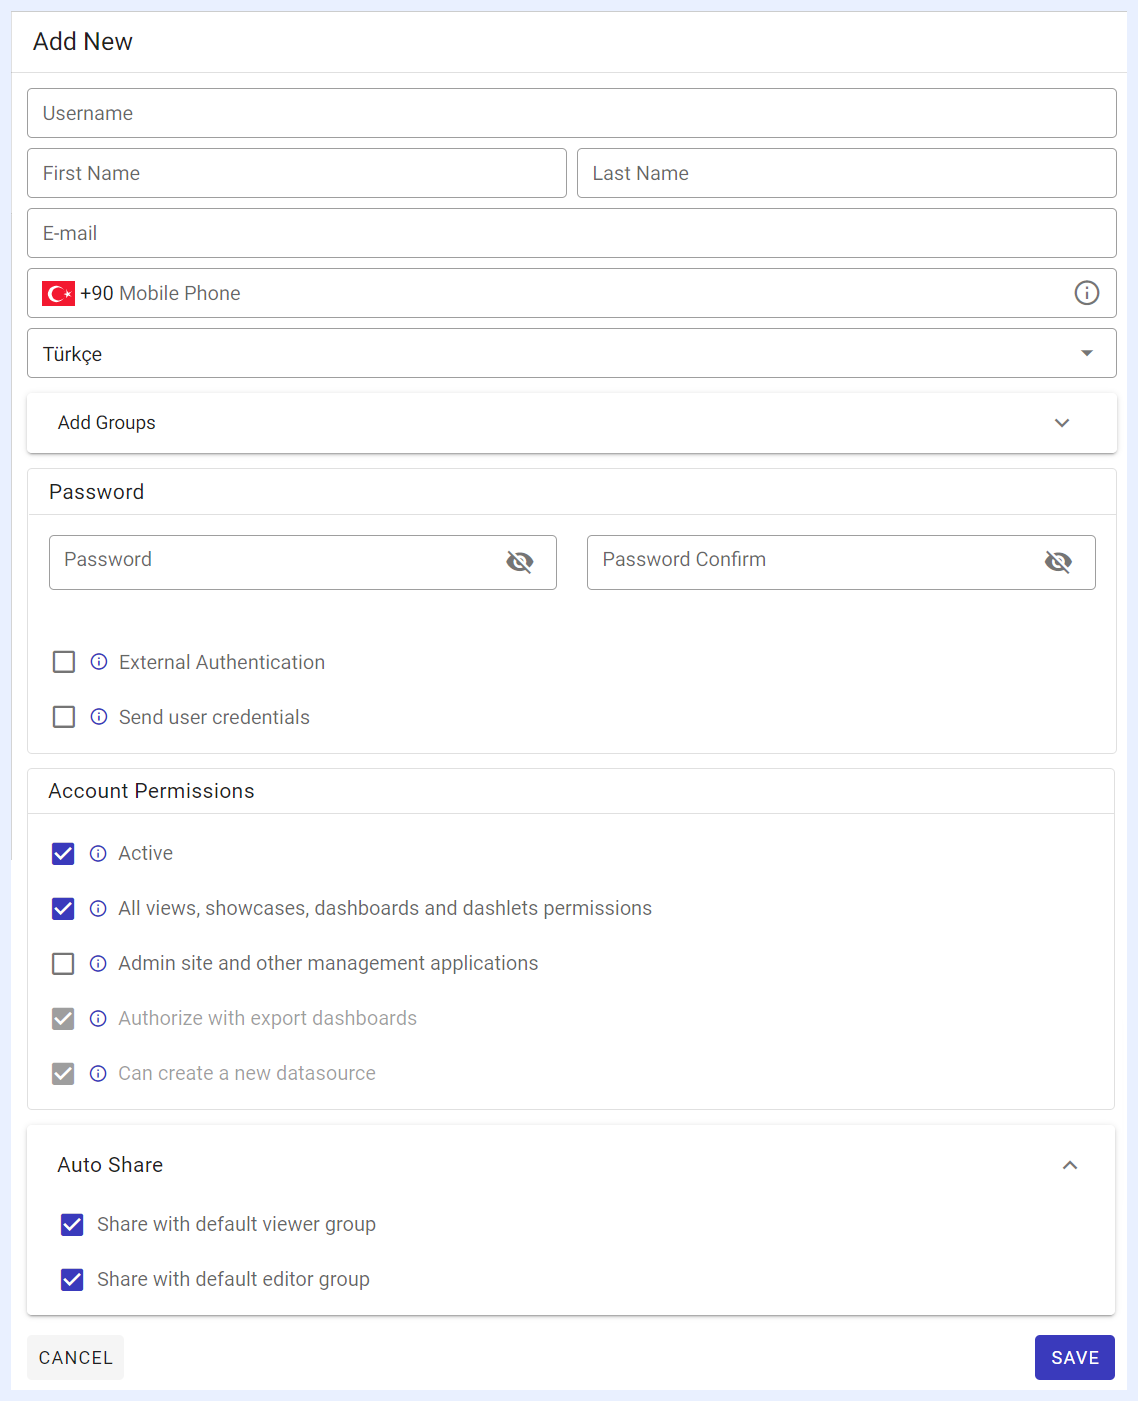
1 Go to Administration > User & Auth > Users > Click + Add a new user icon at the left-top.
2 Fill User Login Fields:
-
Username: username to login to TURBOARD.
-
First Name, Last Name of the user.
-
E-mail: notifications and reports will be sent to the user via this e-mail address.
-
Mobile Phone: SMS notifications will be sent to the user on this number.
-
Select Language: TURBOARD’s default interface language that will appear to the user.
-
Add Groups: this option allows you to assign this user to a group of users by selecting the required group from the drop-down list. Groups can be configured and added in “Groups” section and will auto-appear in this field.
3 Enter Login Password and Credentials:
Password and Retype Password: if this user will login normally to TURBOARD via a manually determined password, fill these fields.
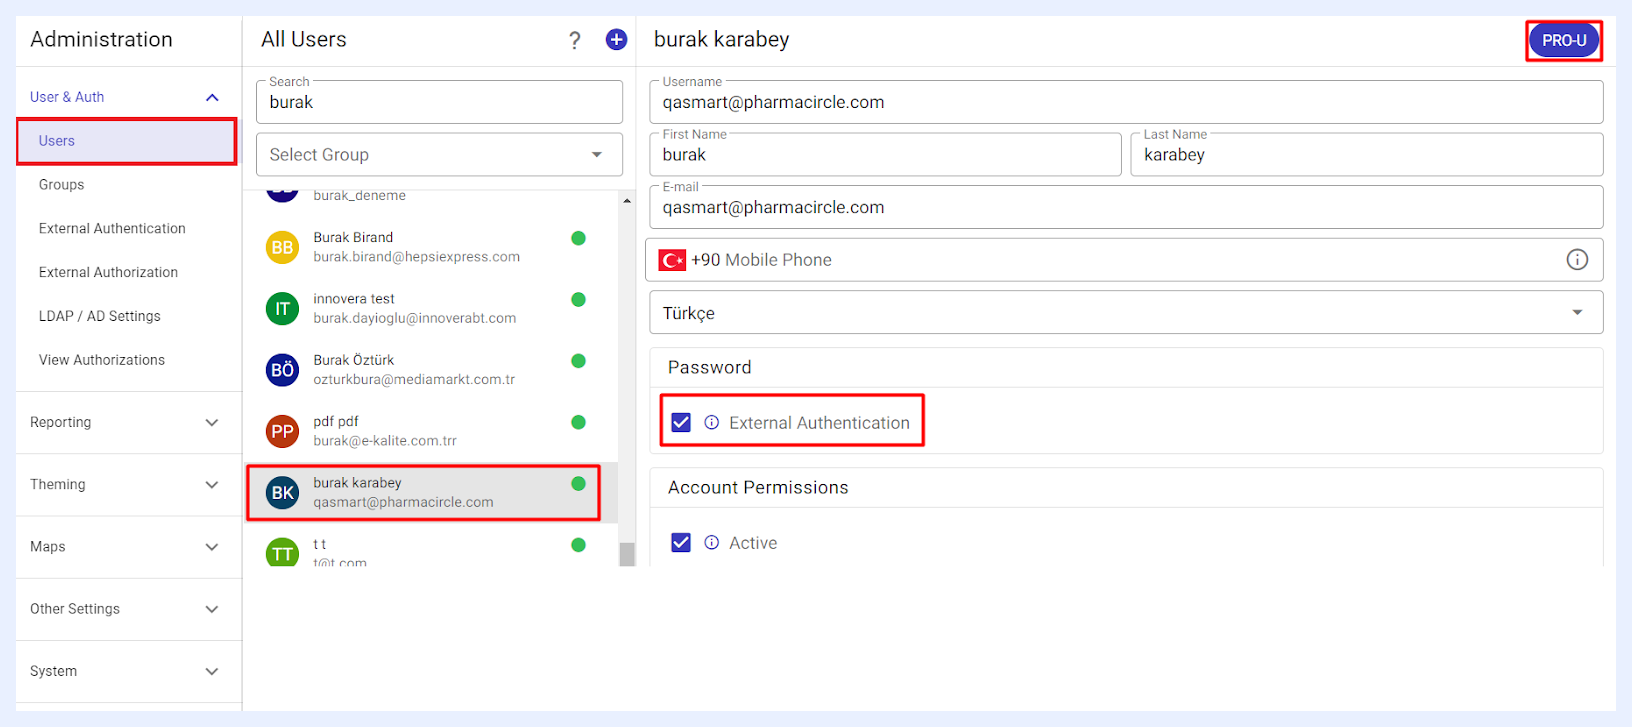
External authentication: this check box will be automatically checked for the users that are fetched and automatically added from an external system such as LDAP or Active Directory, or from an external table in the “Edit” mode for such users. These users’ login credentials will be the same as theirs in the external system/table. In this case, a manually generated password or auto-generated credentials are not needed and those fields are disabled.
Send user credentials: if checked, the login password and credentials will be auto-generated and sent to the user’s e-mail address. The user will receive a link to reset the password within 24 hours’ time window.
Note
»If users will be fetched and authorized from an LDAP or an Active Directory, it is configured in Administration > User & Auth > LDAP / AD Settings.
» If users will be fetched and authorized from an external table, it is configured in Administration > User & Auth > External Table Authentication.
4 Determine user/account permissions:
-
Active: checked by default. If unchecked, the login account will be inactive. This option can be used to deactivate users instead of deleting their accounts.
-
All views, showcases, dashboards and dashlets permissions: when unchecked, the user is a “Viewer User” only when showcases, dashboards and dashlets are shared with him/her. If checked, the user will have “Editor” permissions to add/edit/share views, showcases, dashboards and dashlets (Designer User).
-
Admin site and other management applications: check if the user is allowed to add/edit “Administration” settings (i.e. become a Super Admin User).
-
Authorize with export dashboards: check to give permission to the user to export dashboards (activates “Export” button for this user in dashboards).
-
Can create a new data source: check this box if the user is allowed to add/edit Data Sources.
5 Determine Auto Share permissions:
-
Share with default viewer group: checked by default to automatically share the dashlets, dashboards, showcases and/or performance cards that this user created with all “Viewer” users.
-
Share with default editor group: checked by default to automatically share the dashlets, dashboards, showcases and/or performance cards that this user created with all “Editor/Designer” users.
Note
If the check boxes for auto-sharing above are checked, their related groups will be automatically added to the “Share” feature for each element created/edited by the user and will appear as built-in default groups inside the “Share” window. This means that this user can use the “Share” feature that is available on the element level (dashlets, dashboards, showcases and/or performance cards) in order to: » share the element with other users than the users of these groups, » provide a public link/access to the element, » hide the element and revoke the auto-share from the default group(s).
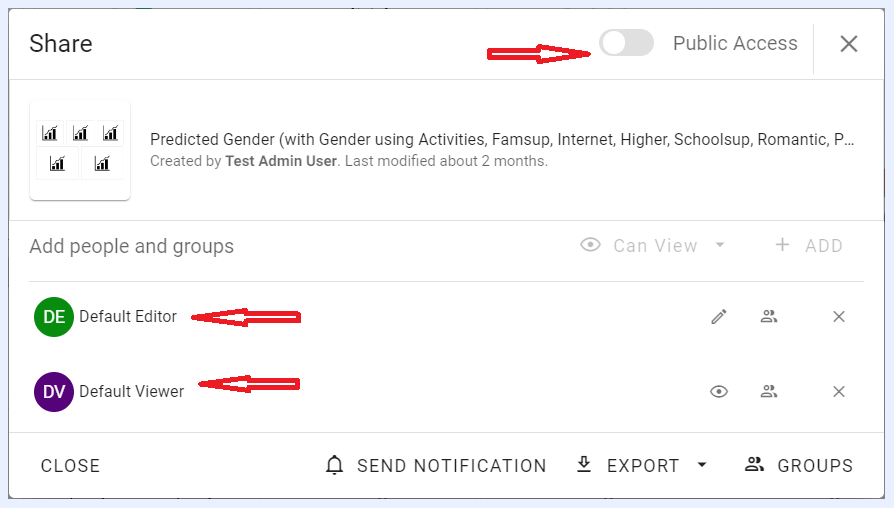
“Share” Window for a Dashlet Created by a User with Auto Share Permissions
6 Click SAVE button.
Note
Users can change/edit login details, password, interface language, auto-share options, deactivate e-mail and/or SMS notifications from “Edit Profile” section. Their permissions, however, can be granted and edited by a system “Super Admin User” only from this section.
Groups
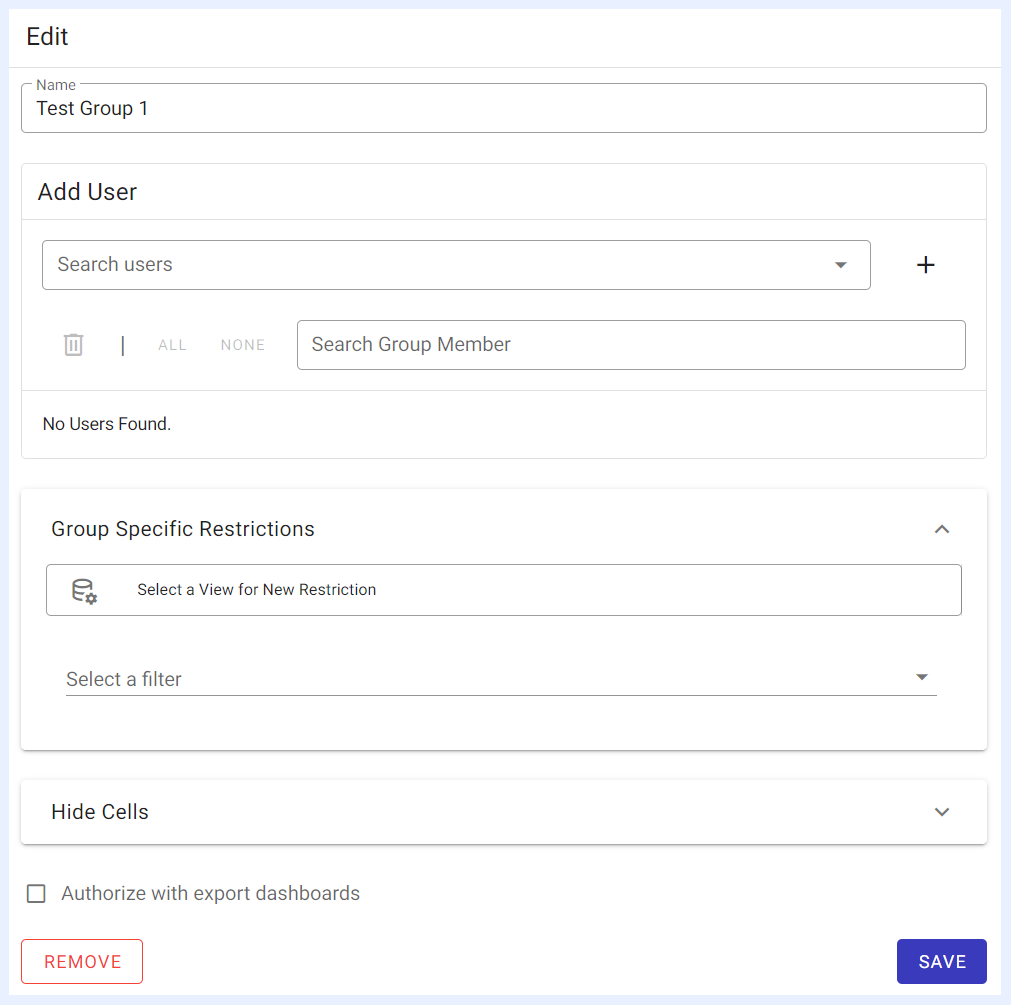
From this section, the Super Admin user can create groups and add users to them in order to:
-
Give bulk permissions to export dashboards for all the users added to the same group,
-
Restrict the users under the same group to view certain default values of a selected node in dashboards.
-
Hide certain data from all the group users.
-
Share views, dashlets, dashboards and showcases whenever desired to the whole group of users instead of selecting each user separately.
How to add a user group in TURBOARD?
1 Go to Administration > User & Auth > Groups > Click + Add a new group icon.
2 Give a name to the new group and click SAVE button.
3 Add users to the group and determine the required permissions and restrictions in the related fields.
Assets
Both the user and the group administration pages include an “Assets” section that provides a centralized inventory of every View, Dashlet, Dashboard, and Showcase shared with that user or group. For each asset, the exact permission level (Edit or View) is shown along with a direct shortcut link to the asset itself, making it straightforward to audit and manage what each user or group can access.
External Authentication
For corporations with thousands of BI users, creating/adding each user manually is inconvenient. Therefore, users can be automatically created in TURBOARD by fetching them and authenticating their login credentials from an external source table which can be an excel file or a table from your database. This means that TURBOARD will sync authorizations from other application databases without the need for manual effort. Users in this case can login to TURBOARD using the same credentials they use to login to their other business application.
Important
Before proceeding with this section, make sure that the external data source where the table of your users is stored in is added/configured in TURBOARD’s data sources.
How to Configure External Authentication?
In this section, the Admin user configures the details for TURBOARD to connect to the external table of users as below:
1 Go to Administration > User & Auth > External Authentication.
Data Source: a drop-down list with the client’s data sources that are added/configured in TURBOARD in which the Admin user selects the data source where the table of users is located.
2 Fill the information in the window that opens as below:
-
Data Source: a drop-down list with the client’s data sources that are added/configured in TURBOARD in which the Admin user selects the data source where the table of users is located.
-
Table: a drop-down list with all the connected tables for the selected data source from which the Admin user selects the table where the users’ data exist.
-
Username, Email, First Name, Last Name, and Password fields: all the fields for the selected table will be automatically displayed as drop-down lists in these fields from which the Admin user selects the related fields.
-
Hash Type: a drop-down list with the types of password hashing algorithms that allows the Admin user to select the hashing type for password protection and authentication.
-
Salt Type: if an additional layer of security is added to the password hashing process, it can be selected from this drop-down list. If “field” is selected, the Admin user shall select the field name where the salt is stored in the table. If “text” is selected, the salt text shall be entered in its related field.
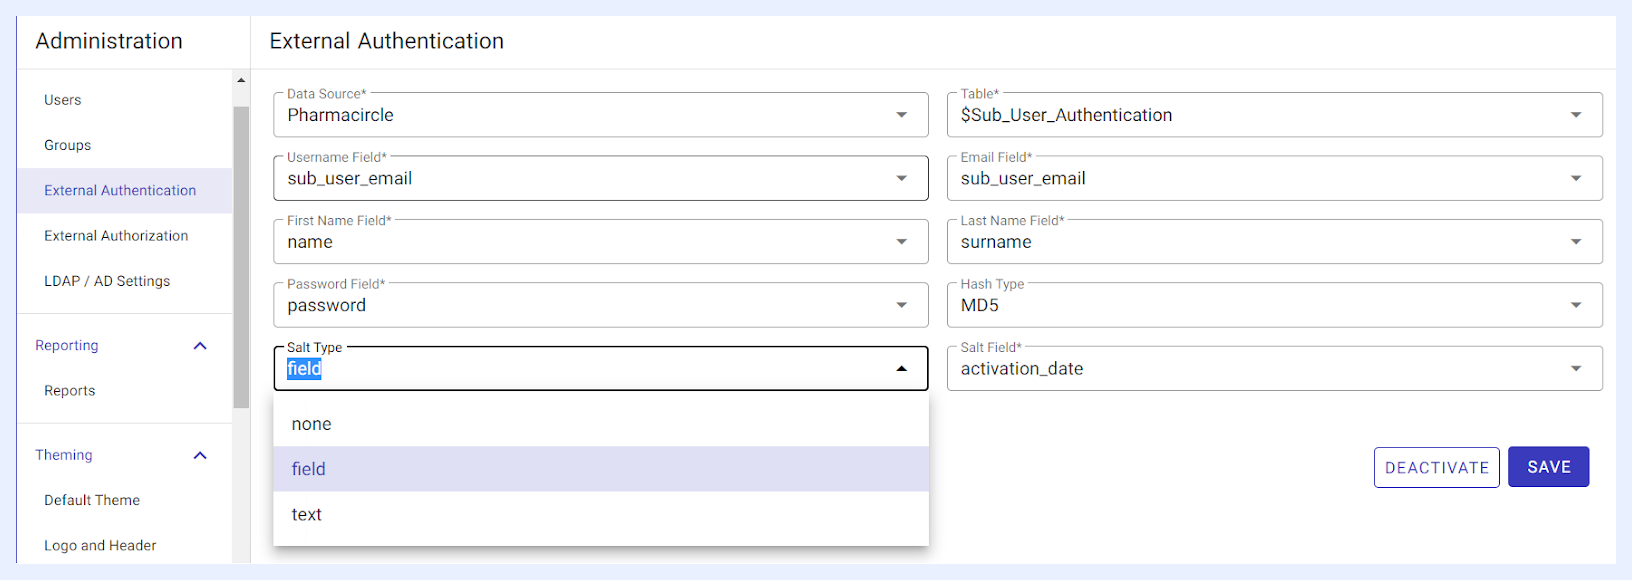
3 Click SAVE button.
4 Upon clicking SAVE button, the system will automatically create users from the related table and add them to “Users” list under “User & Auth” section:
All added users will have “Viewer User” authorizations and permissions by default. This is because “Viewer” users are the largest portion of BI users, while “Admin” and “Designer” users are usually just a few and can be added manually.
The added users will have “External authentication” check box automatically checked to indicate how they were added to the system.
5 DEACTIVATE button: when clicked, it will disable login to TURBOARD for all users that were fetched from the external table. The Admin user can re-activate the authentication by clicking ACTIVATE button.
Note
When a new user is added to the external table any time later on and attempts to login to TURBOARD portal using the same credentials in that table, TURBOARD will automatically check all users from the external table and cross-refer to TURBOARD fetched users. If a new user is found in the table, it will be fetched and added as a new TURBOARD user automatically.
External Authorization
In TURBOARD, you can customize the granted permissions/authorizations for users on group level. However, if the users are categorized into several groups, with hundreds or thousands of users in each group, adding them manually to their related group is inconvenient. Therefore, the Admin user can define and determine each group’s permissions in “User & Auth/Groups” section, then add their users from this section automatically from an external table.
As an example, a TURBOARD client may have its BI users divided into several categories where each category has specific data to view on TURBOARD different from others such as:
Top management users who may need to view certain dashboards/showcases different than other departments,
Financial or accounting department users who may need to view specific financial data and analysis,
The business clients who may need to be restricted from viewing sensitive data.
If you have your users listed with their group name/category on your database or an excel file, you can easily add them to TURBOARD User Groups by fetching them automatically from the relevant external table/sheet through this screen.
Important
Before proceeding with this section make sure that the external data source where the table of your users and their groups is stored in is added/configured in TURBOARD’s data sources.
Adding Users to Groups from an External Table
How to add users to external groups from an external table?
1 Go to Administration > User & Auth > External Authorization.
2 Check “Enable external table authorization” check box.
3 Provide the information of the external table that TURBOARD will connect to in order to fetch its users in the related fields as below:
-
Data Source: a drop-down list with the client’s data sources that are added/configured in TURBOARD in which the Admin user selects the data source where the table of users is located.
-
Table: a drop-down list with all the connected tables for the selected data source from which the Admin user selects the table where the users’ data exist.
Note
Make sure to set a “Primary Key” for the column that uniquely identifies your users in the table (in data sources settings). This ensures avoiding inconsistency, efficient data retrieval and preventing duplicate rows. If the selected table does not have a primary key field, TURBOARD will notify you accordingly.
Username, Email, First Name, and Last Name fields: all the fields for the selected table will be automatically displayed as drop-down lists in these fields from which the Admin user selects the related fields.
Synchronization frequency and time: if new users might be added to the external table every now and then and/or if the related group of some users may change in time, the Admin user selects the frequency and time for TURBOARD to reconnect to the external table and synchronize its users and groups with TURBOARD’s. This will eliminate the manual effort of adding new users to TURBOARD groups as they will be added/updated automatically according to the selected synchronization frequency.
4 Click START SYNC button.
5 When the synchronization process is completed, it will be confirmed in “LastSyncLog”, “Sync Start Date” and “Sync End Date” sections.
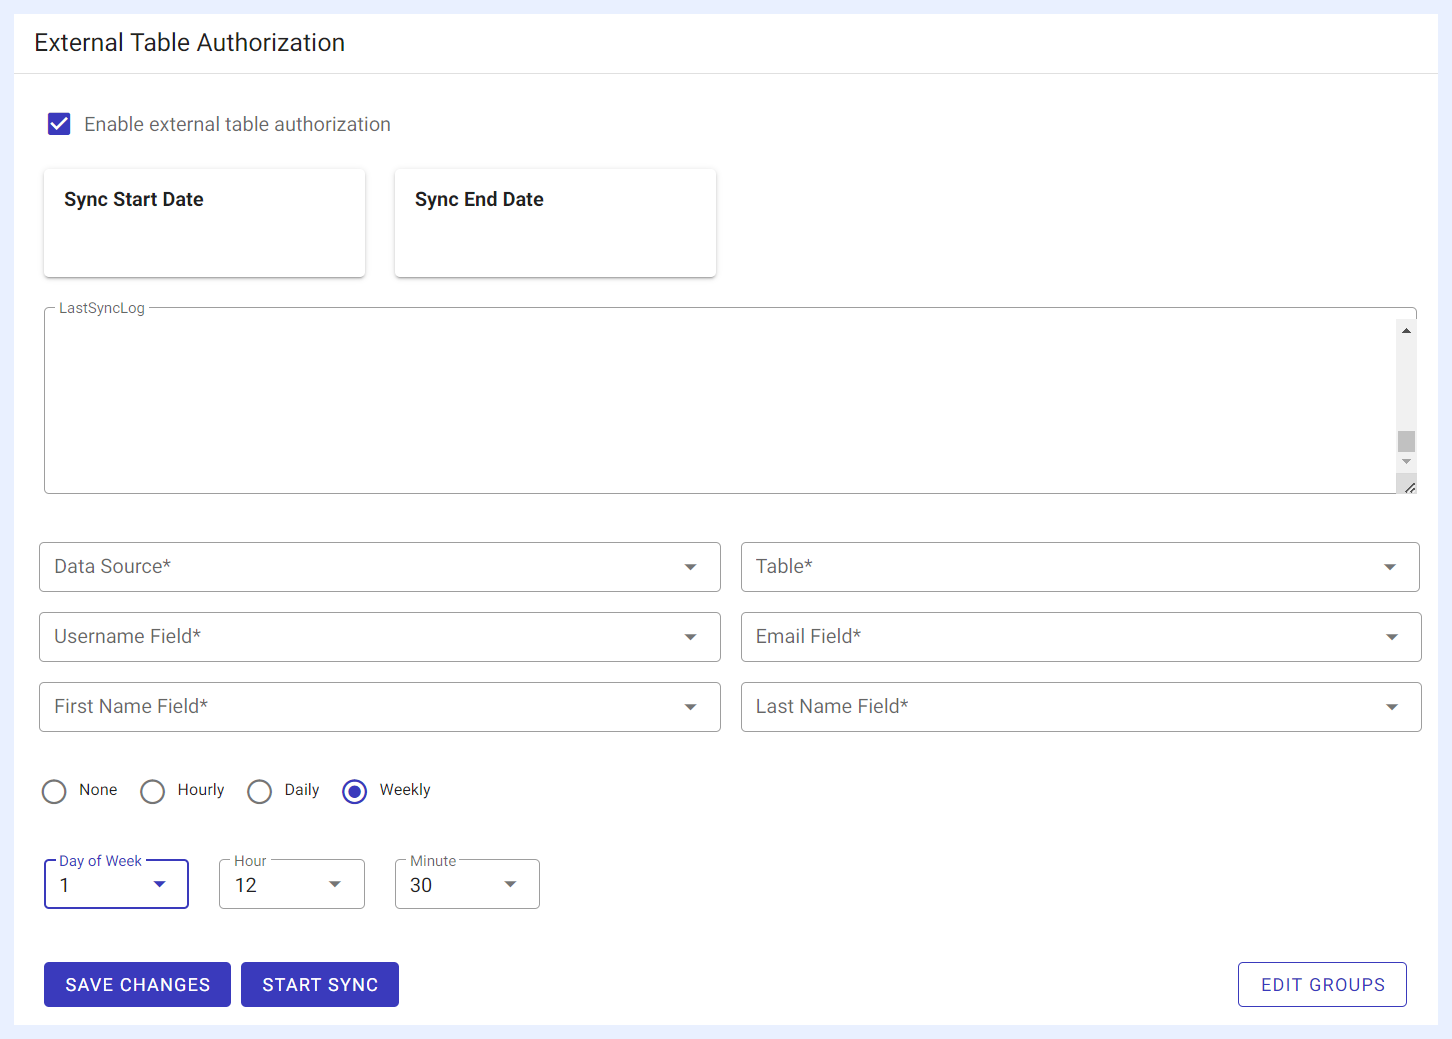
6 Once the synchronization process is completed, click EDIT GROUPS button.
7 Click + Add a new external group icon in the window that opens and give a name to the group that you want to add specific users to from the external table (Manager Users for example).
8 Connect the new group to the required users in the external table. Select the field(s) and value(s) from the table fields’ drop down menu in “External Table Filter”. The system will filter the users and add those to the group according to your selection here. Use the + button to filter as many users as needed.
9 Determine the data restrictions for this group. You can restrict its users from node(s) and/or field(s) within any view. Use the + button to add as many restrictions as needed.
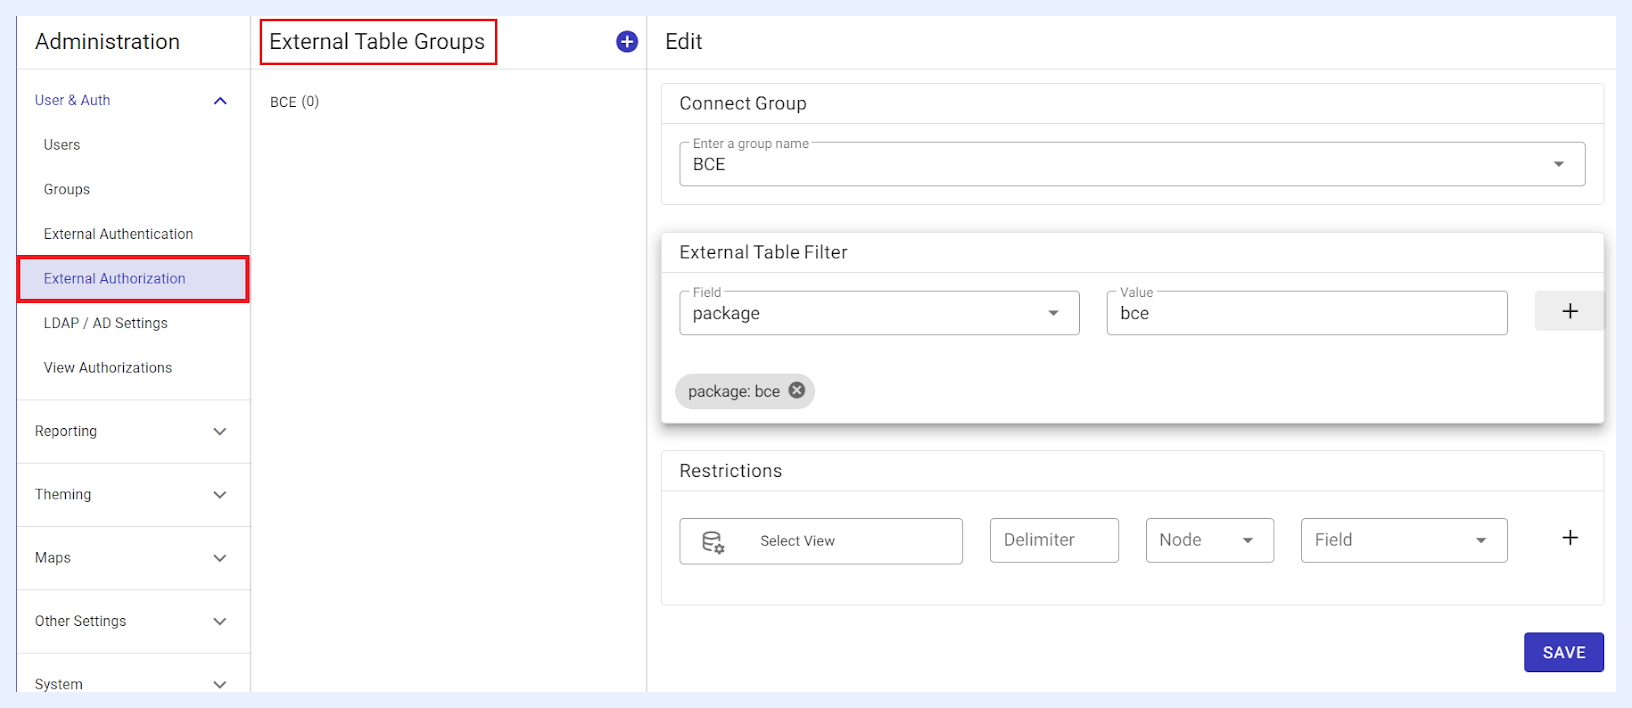
10 Click SAVE button, then click External Authorization under Administration menu to go back to the main window. Click START SYNC button again.
11 Once the synchronization process is completed, TURBOARD will automatically fetch all users from the external table according to the determined filtering criterion/criteria above and will automatically add them as a TURBOARD Group under Administration > User & Auth > Groups. Additionally, any new users that are added to the external table will be added automatically according to the determined synchronization frequency/interval.
Note
When a user from the external group attempts to login to TURBOARD for the first time, the system will:
» Automatically check all users from the external table and cross-refer to TURBOARD fetched users,
» Add the user to TURBOARD users under Administration > User & Auth > Users.
LDAP / AD Settings
Users can login to TURBOARD application with LDAP and Active Directory, one of the most commonly used login methods.
Logging into TURBOARD using AD configuration means that the system will authenticate the user's credentials against an Active Directory domain, allowing for secure and centralized management of user accounts and integration with other Microsoft products. Logging using LDAP configuration means that the system will authenticate the user's credentials against an LDAP directory, allowing for secure and centralized management of user accounts from the same directory.
Configuring LDAP/AD Login for TURBOARD Users
How to configure TURBOARD users’ login from an LDAP or AD directory?
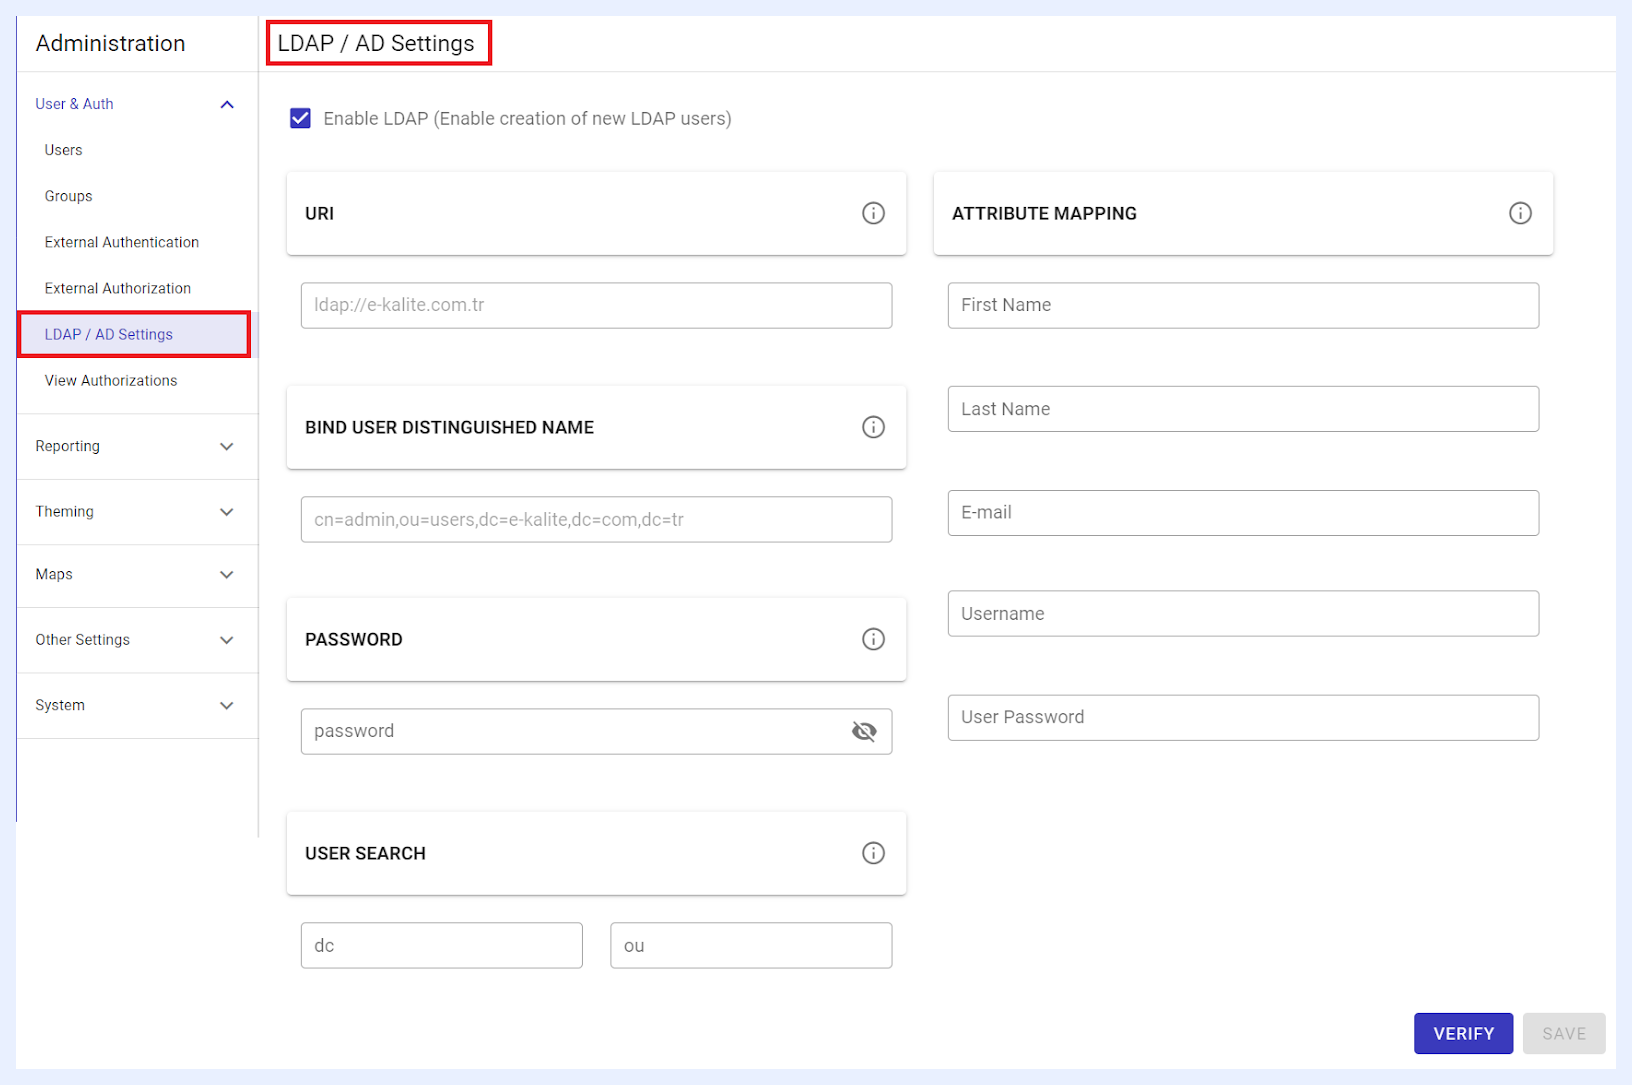
1 Go to Administration > User & Auth > LDAP / AD Settings.
2 Check “Enable LDAP (Enable creation of new LDAP users)” check box.
3 Enter LDAP/AD connection details in the related fields as below:
-
URI: Enter the LDAP/AD server’s Uniform Resource Identifier. For example, (ldap://e-kalite.com.tr).
-
BIND USER DISTINGUISHED NAME: Enter the full distinguished name of the bind user, such as (cn=admin,ou=users,dc=e-kalite,dc=com,dc=tr).
-
PASSWORD: Provide the bind user's password for authentication purposes.
-
USER SEARCH: Specify the search base for user authentication. There are two fields here: the field labeled as “dc” should contain the domain components. For instance, (dc=e-kalite,dc=com,dc=tr).
-
The field with the tooltip “ou” stands for “Organizational Unit” and should be filled with the relevant OU details.
-
ATTRIBUTE MAPPING: Align LDAP attributes to corresponding TURBOARD user information fields. Assign LDAP fields to match TURBOARD’s requirements for First Name, Last Name, E-mail, Username, and User Password. Leave these fields blank if the LDAP server’s default attributes are to be used.
4 After completing these steps, click VERIFY button to confirm the configuration is correct and operational.
Note
When any of the LDAP/AD configured users successfully logs into TURBOARD for the first time, they will be automatically added as TURBOARD users and marked as “External Authentication” users.
Multi-Factor Authentication (MFA)
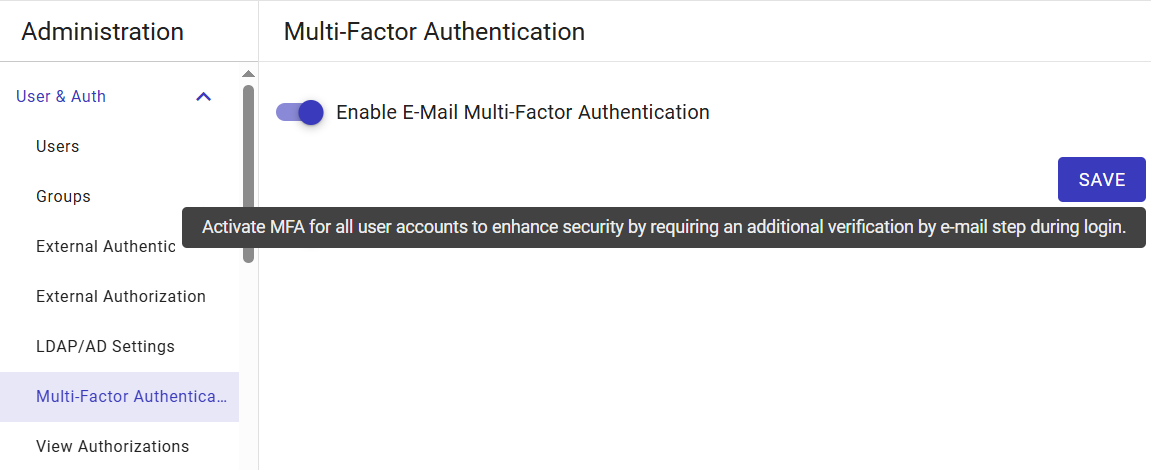
Administrators can enable Multi-Factor Authentication by e-mail for all users from Administration > User & Auth > MFA Settings (/admin/auth/mfasettings). Once enabled, after entering their credentials, users must also enter a one-time password (OTP) that is sent to their registered e-mail address before they can complete the login, adding an extra layer of account security.
Session Settings
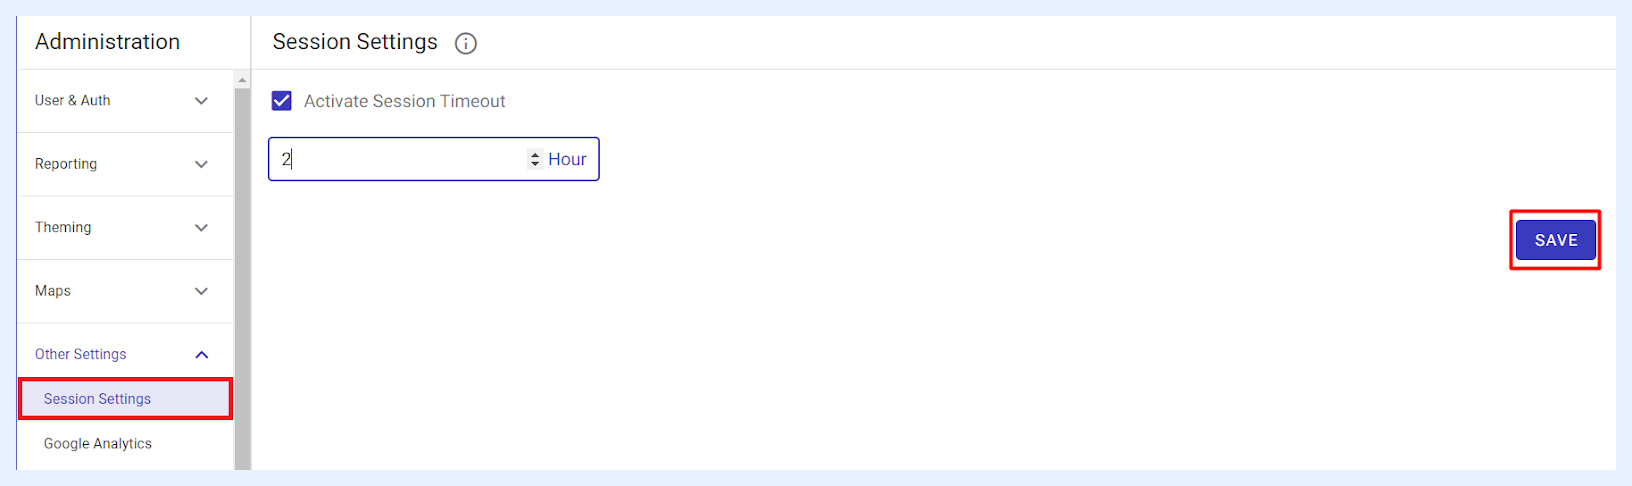
The default setting for session timeout for TURBOARD users is none. However, the Admin user can determine if a Session Timeout is needed for TURBOARD logged-in users.
If the “Activate session timeout” check box is checked and the number of hours is determined (as integer number), this means that the system will automatically terminate any user login session if within the determined interval this user has not performed any action on TURBOARD.
View Authorizations
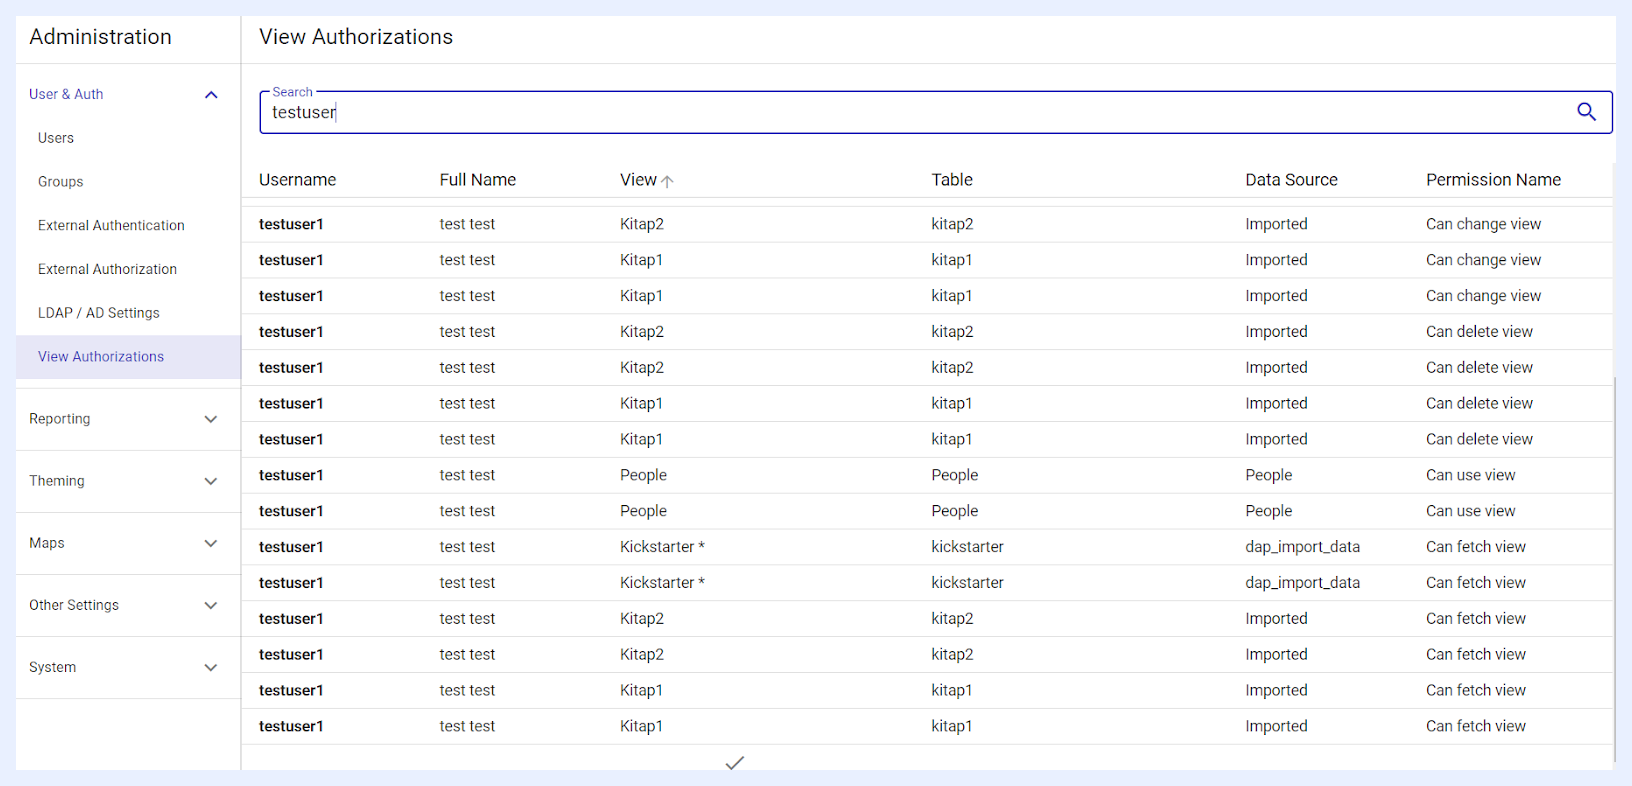
The View Authorizations window is a specialized interface for administrators to audit the permissions granted to users regarding the “Views” within TURBOARD. This section is essential for overseeing who has access to specific sets of data visualizations and analytics.
This window does not allow for the alteration of permissions but rather provides a comprehensive and transparent audit of who can interact with which Views and how, reflecting the structure and permissions set up through the View “Share” process.
The admin user can swiftly locate specific records using the search bar, which supports partial match searches for User Name, Full Name, View Name, and Table Name. This feature enhances the ability to quickly identify and audit user access rights.
Additionally, records can be efficiently organized as administrators have the option to sort the data by clicking on the respective column headers, arranging the audit trail in a preferred ascending or descending order. This sorting functionality applies to all columns, facilitating a tailored overview of user permissions within the Views.