Creating Views
How to Create a View?
1 From Views section under the Navigation Sidebar Menu, click + Create New View icon.
 Views – Add New
2 In the overlay window that opens, you are presented with different options in which your view can be fetched and prepared from. Each option is described in detail in the sections below.
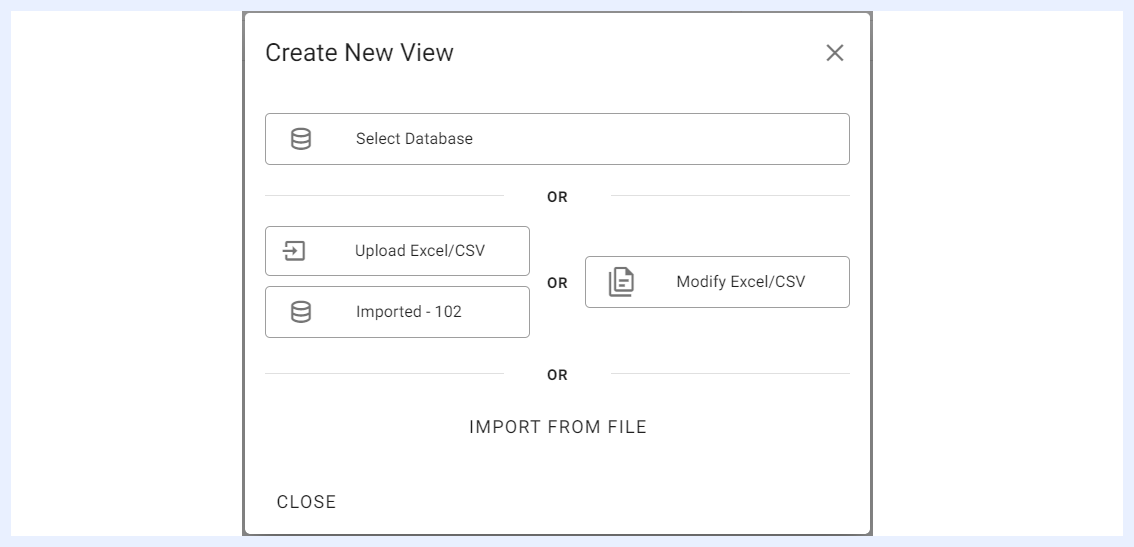 Create New View Overlay Window
Creating a View From Table(s)
1 Go to Views > + Create New View > select the relevant database from Select Database combobox > click Select Table option.
2 A new window will open in which the tables, their schema, fields and the relations between them for the selected data source are automatically detected by TURBOARD as below:
- Data Source Tables: all the connected tables are listed under this menu. The user shall select/click the table(s) that will create the view(s) from. TURBOARD assigns a gray circle to the tables that are related to other tables in the list.
- Selected Tables: when a table from “Tables” list is clicked, it will be listed under this section. When a table is clicked, other tables (under “Tables” list) that have relations to it will be automatically marked with circled R.
- Tables Fields: when a table is clicked from “Selected Tables”, its fields will be displayed under this section.
3 If several tables were selected in which some of them are related, you may determine the main data table for the related tables by selecting it from “Selected Tables” and clicking SET AS BASE button.
4 For each selected table, you may select the fields that you want to be added to the created view, unselect the ones that you want to delete from the created view. The fields that have relations with the base/main table will be auto-selected and cannot be removed from the created view.
5 Click CREATE DATA VIEW button.
Note
When clicking CREATE DATA VIEW to create a new view, each group of tables that are related to each other will be created in one view. This means that several views might be created depending on the selected tables’ relations.
Creating a View From Query (Express ETL)
TURBOARD’s SQL import process relies on optimized integrity checks to provide fast and reliable imports for SQL-based views, with native support for a range of databases including MariaDB, Vertica, Clickhouse, and TimescaleDB.
To create a view from an SQL query in TURBOARD, follow these steps:
1 Navigate to View Creation:
- Go to Views > + Create New View.
- Select the relevant database from the
Select Databasecombobox. - Click the
Write Sqloption.
2 Write and Validate the Query:
- On the left side of the querying page, write your SQL script.
- Click the
► DRY RUNbutton to check the validity of the query. - Once the query is successfully validated, give a name to your new data view at the top left corner of the window by replacing “Untitled View” with your chosen name.
- Set or adjust the Automatic update frequency at the bottom of the window.
- Click the
CREATE DATA VIEWbutton.
3 Result and Nodes Creation:
- The result of the query is stored in TURBOARD’s database (MariaDB is the default database that comes along with TURBOARD installation).
- The new view is automatically listed under the “Views” listing page.
- Initially, the results fetched from the query are represented as Nodes under the Nodes tab in the View.
Incremental Loading for SQL Views
SQL-based views can be configured to load incrementally. When enabled, TURBOARD fetches only new or changed rows since the last refresh, using a selected date column to determine what has changed. This shortens refresh times considerably for large tables and reduces the strain on the source database. The option is available from the view settings when working with custom SQL views.
Indexes and Process History for SQL Views
For SQL-based views, all indexes defined on the view are visible in the view configuration and are protected during data refreshes. A process history is also kept for each view, providing a full audit log of the refresh status, run times, durations, and row counts for every past refresh operation, which is useful for diagnosing slow or failed refreshes.
Creating a View From File (Excel/CSV)
1 From the Navigation Sidebar Menu > Go to Views and click + Create New View.
2 Under Upload Excel/CSV option, determine the datasource where you want the file data to be imported to by selecting the desired datasource from the drop down list of datasources. The list displays all datasources that are marked as ‘Use as import datasource’.
3 Upload the required file by clicking the Upload Excel/CSV option. Note that the file name shall not exceed 100 characters long.
4 Prepare your view as below:
- The header row can be set by clicking
Set this row as headericon. -
When clicking on columns pop-up menu, it will give you options to manipulate and change several details in the excel – if needed as follows:
-
The data type can be changed. For example, if the field is just 0 and 1, you may set it to “Boolean” instead of “Integer”.
- Column names can be changed – if their naming does not reflect their purpose.
- Any column can be removed – if its data is not needed.
- Any column can be set as primary.
- Any row can be removed – if its data is not needed.
5 The view will be renamed automatically as the uploaded file name, but you may change it if required.
6 You may undo the changes you applied to the file by clicking Return To Template icon to rearrange your data again before creating the view, or re-upload the file through Update Excel/CSV icon in order to refresh its fetched data – in case the original file is updated.
7 Click Create New Table/View icon at the right-top of the page to complete the process.
8 The data is fetched from the excel file and dumped to the selected datasource and listed as a new view under “Views” page. Upon successful creation of the view, its “Edit” window will open automatically in order to manage its settings and features – if needed.
Refreshing a View through Modify Excel/CSV Option
For views created from Excel/CSV files, if the data in the excel file has changed with time, you can refresh the data by uploading the file again through the “Modify Excel/CSV” option.
1 Go to Views > + Create New View > click Modify Excel/CSV option.
2 Choose the view that you want to refresh from the drop-down menu. All views that were created from Excel/CSV files will be listed in the menu.
3 Upload the updated file again by clicking Update Excel/CSV icon. If the file name was not changed, its updated data will be automatically replaced in the same template.
4 By clicking Reset Template icon, it will reset the table of the view back to the excel file settings, and you may edit and change the settings of the template similarly as in Point No. 4 in “Creating a View From File (Excel/CSV)”.
5 You can change the data Insert Type from “Overwrite” (Default) to “Append” – if needed. Note that “Overwrite” will replace the existing data in the template with the updated data values from the uploaded file, while “Append” will add any new data values/rows without deleting any of the previous data.
6 Other options for managing the view are available as below:
- Imported Table icon: upon click, it will open the related table of the view in “Edit” mode.
- Imported View icon: upon click, it will open the view in “Edit” mode to manage its settings and features.
- Delete icon: upon click, it will delete the view from MariaDB data source.
7 Once your view is set and updated as required, click Update table and go to view icon button at the right-top of the page.
Note
You may update the Excel/CSV file and refresh its related view data from the view “Edit” mode > Edit Imported File icon.
Creating a View from Imported File
In TURBOARD, users can export (through “Share” option) any TURBOARD element, starting from views, dashlets, dashboards and up to a whole showcase into an external file (a .tur custom file format specific to TURBOARD application) compressed inside a .zip folder.
This allows users to replicate such elements – instead of creating them from scratch, applying their analysis to another data source, and/or copy some elements into another TURBOARD PROD – through importing the same file into TURBOARD again.
Benefits of Importing/Duplicating a View
For views in TURBOARD, when IMPORT FROM FILE option is used, this allows you to:
- Create a new view for a different data source as a replica of another view available at another data source. As you may prepare a view with several custom filters, user-defined expressions, parameters and other settings, the “Import” feature allows replicating all such user-defined settings automatically and connecting them to another data source without the need to set them manually again in the new view.
- Analyze historical data and compare it with the latest data if your historical data is stored in another data source or database.
- Copy a view into another TURBOARD product installation.
Conditions for Creating a View from Imported File
One condition is required to complete the creation successfully: the data tables in the new data source must have the same name and structure (fields/nodes) of those in the exported view file.
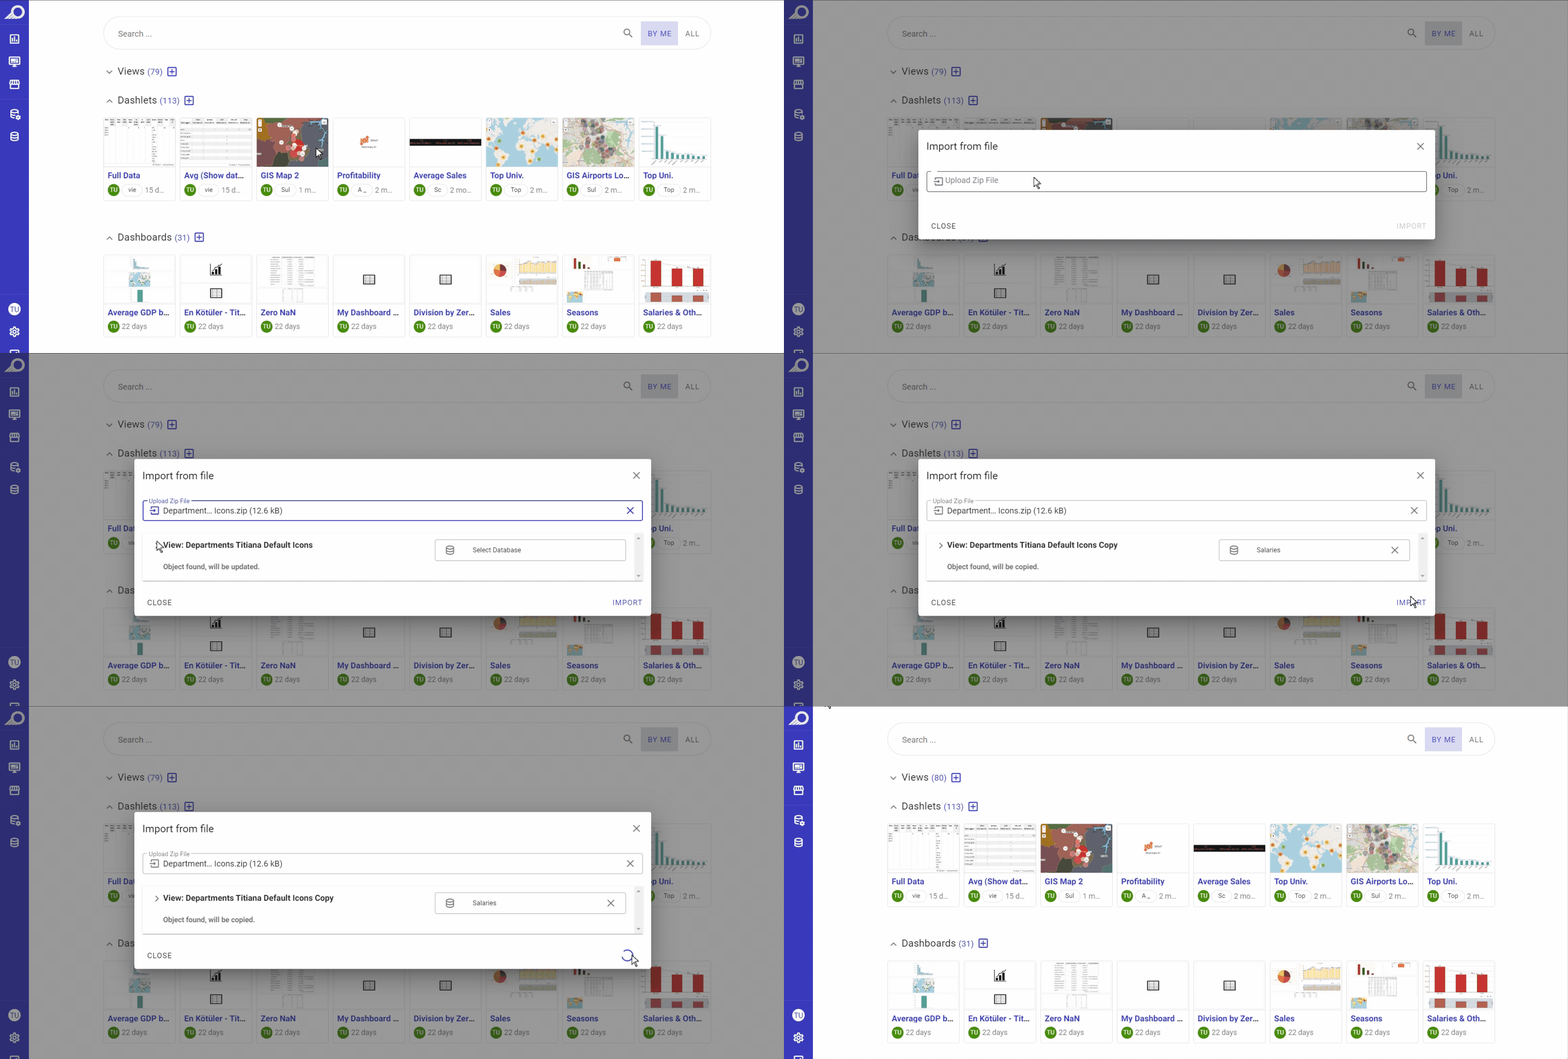
1 Go to Views > + Create New View > click IMPORT FROM FILE option.
2 Upload the exported (.zip) folder that contains the .tur custom file. TURBOARD will automatically detect the tables and the data structure in the file and will apply them to the new view. The structure and the detected elements (nodes, filters, restrictions, etc.) will be listed in the overlay window.
3 From “Select Database” drop-down menu, choose the target data source that you want to link the created view to. All the data sources that are added to TURBOARD will be listed in the menu.
4 Click IMPORT button. The new view will be created and connected to the target data source.