JAS
GenAI Settings
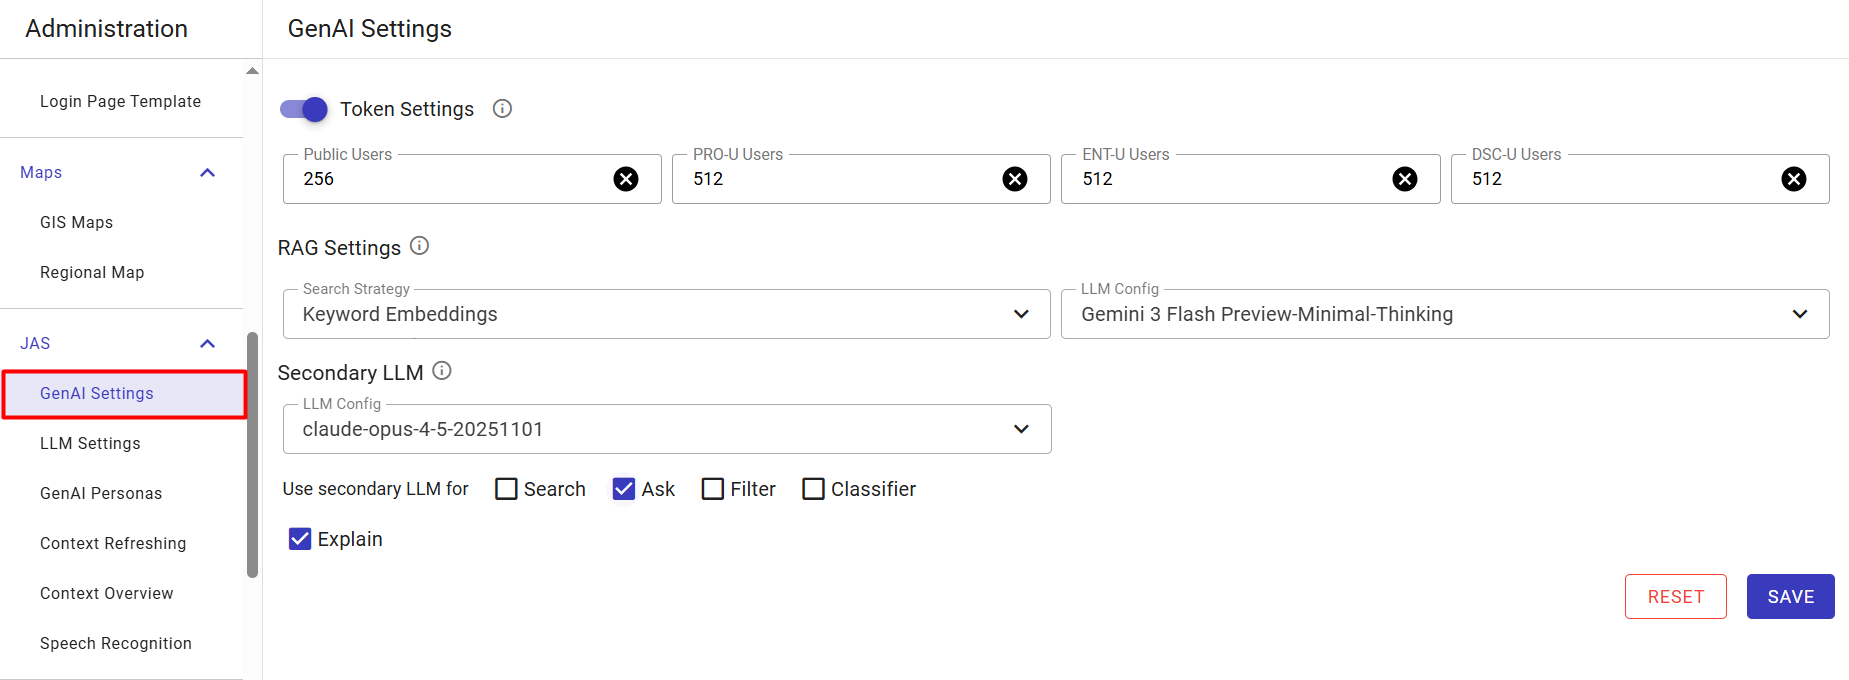
The GenAI Settings page serves as the foundational configuration hub for JAS (JustAskSimply). Administrators use this screen to manage token consumption limits across different user license tiers, configure the core RAG (Retrieval-Augmented Generation) search behavior for the platform landing page, and optionally route specific AI workloads to a secondary LLM.
Configuring Token Limits
Token limits control the maximum length of the responses JAS can generate. By defining these limits per user tier, administrators can manage AI processing costs and prevent excessive token consumption.
1 Go to Administration > JAS > GenAI Settings.
2 Locate the Token Settings section and ensure the toggle is switched ON.
3 Define the maximum output token limits for your configured user types (e.g., Public Users, PRO-U Users, ENT-U Users, DSC-U Users).
Note
These limits control exactly how many tokens JAS can generate in its responses. The minimum allowed limit for any user type is 256 tokens.
Configuring RAG and Search Strategies
1 In the RAG Settings section, click the Search Strategy drop-down menu to select the specific method JAS will use when users search for dashlets, dashboards, showcases, and views from the TURBOARD landing page (e.g., Keyword Embeddings).
2 Click the LLM Config drop-down menu to select the primary AI model that will execute this search strategy.
Note
The options available in the LLM Config drop-down list are populated directly from the configurations you have previously added in the LLM Settings administration page.
Routing Tasks to a Secondary LLM (Optional)
TURBOARD allows you to offload specific, complex AI workloads to a different model. For instance, you can use a fast, cost-effective model for basic search queries while routing heavy analytical tasks (like generating dashboard explanations) to a more capable reasoning model.
1 Locate the Secondary LLM section.
2 Click the LLM Config drop-down menu to select your optional secondary model. (Note: To completely disable the secondary LLM, simply click the X clear icon inside the field).
3 Under Use secondary LLM for, check the boxes for the specific JAS capabilities that should be routed to this secondary model instead of the primary one:
- Search
- Ask
- Filter
- Classifier
- Explain
4 Once all configurations are complete, click SAVE button at the bottom right to apply the settings, or click RESET button to revert to the previously saved state.
LLM Settings
TURBOARD’s GenAI Assistant, JAS, features flexible Large Language Model (LLM) orchestration. From this section, administrators can configure, fine-tune, and switch the underlying artificial intelligence models that power natural language analytics and automated data insights across the platform.
TURBOARD supports commercial cloud providers (such as OpenAI and Google Gemini) as well as private, on-premise, or custom-hosted language models.
Adding a New LLM Configuration
1 Go to Administration > JAS > LLM Settings.
2 Click the + icon button (Add new LLM config) located at the top-right of the configurations list.
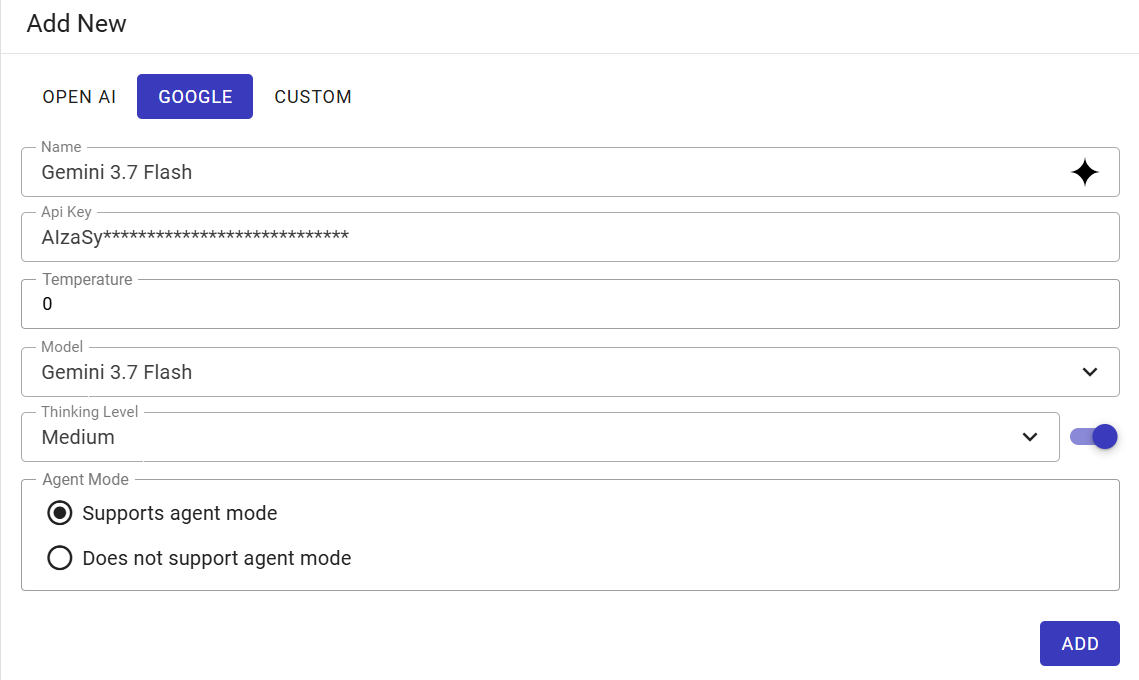
3 In the Add New pane on the right, select one of the three provider tabs: OPEN AI, GOOGLE, or CUSTOM. Fill in the parameters according to your chosen provider:
1. OPEN AI Tab Configures connectivity to OpenAI's official API services:
- Name: A custom display name for this configuration. The official OpenAI badge icon is displayed automatically on the right.
- Api Key: The secret API key generated from the OpenAI developer platform. It will be marked in red if empty or invalid.
-
Temperature:
-
Definition: A numeric value (default
0) controlling response variability and randomness. -
Uses: Lower values (e.g.,
0) produce highly deterministic, analytical outputs where strict accuracy is paramount, such as generating SQL queries or rigid data extraction. Higher values (e.g.,0.7) increase creativity, which is useful when asking JAS to generate varied narrative summaries of dashboards or brainstorm insights. -
Model: A pre-populated dropdown menu containing official OpenAI models (e.g.,
gpt-5-codex,gpt-5-pro,gpt-5-mini,gpt-5-nano). -
Reasoning Effort (Dynamic Field): Automatically appears when a reasoning-specialized model (such as
gpt-5-codexoro-series models) is selected. -
Toggle Switch: Enables or disables specialized reasoning tokens.
- Effort Dropdown: Sets the computational reasoning depth to Low, Medium, or High.
-
Uses: Higher reasoning effort allocates more compute time for the AI to "think" before responding. This is ideal for complex logical deductions, intricate data correlations, or advanced code generation, though it may slightly increase response time.
-
Agent Mode:
-
Definition: Determines whether the model supports autonomous analytical agent workflows.
- Uses: Select Supports agent mode to enable JAS to execute multi-step workflows (e.g., autonomously querying a database, analyzing the results, and deciding which chart to generate). Select Does not support agent mode if you only need the model for simple, single-turn text completions or basic translations.
2. GOOGLE Tab Configures connectivity to Google AI Studio / Gemini API services:
- Name: A custom display name for the Gemini instance. The Google Gemini star icon is displayed automatically on the right.
- Api Key: The API key generated from Google AI Studio or Google Cloud Vertex AI.
- Temperature: A numeric value (default
0) for output determinism, functioning identically to the OpenAI temperature setting. - Model: A pre-populated dropdown list containing Google Gemini models (e.g.,
Gemini 3.7 Flash,Gemini 2.5 Flash). -
Thinking Level (Dynamic Field): Automatically appears when a thinking-enabled Gemini model (such as
Gemini 3.7 Flash) is selected. -
Toggle Switch: Activates or deactivates extended internal reasoning budgets.
-
Thinking Level Dropdown: Controls the model's internal thinking budget (e.g., Low, Medium, High).
-
Agent Mode: Choose between Supports agent mode or Does not support agent mode.
3. CUSTOM Tab Designed for private cloud deployments, local LLM servers (e.g., vLLM, Ollama, TGI), OpenAI-compatible gateways (e.g., OpenRouter), and fully on-premise infrastructure:
- Name: A recognizable identifier for the local/custom deployment (displays a neutral circular badge).
- Api Key: The authentication token required by the custom endpoint. If the private endpoint does not require authentication, enter a placeholder value.
- LLM Model (Open Text Field): Unlike the OPEN AI and GOOGLE tabs which use pre-populated dropdowns, this field is an open text input. Administrators must type the exact target model string identifier as defined on the host server (e.g.,
Inferact/Qwen3.8-Flash-Next-NVFP4,deepseek-ai/DeepSeek-R1, orqwen2.5-coder-32b). -
Add Attribute: A dynamic key-value constructor used to pass arbitrary endpoint URLs, request headers, or model execution kwargs directly to the API client.
- Key: The parameter name.
- Value: The target parameter value.
- Uses: The most common use case is overriding the
base_url(e.g.,https://llm.ebalina.com/v1) to route requests to a private, on-premise gateway, ensuring sensitive BI data never leaves your corporate network. You can also pass specialized kwargs likeextra_body.chat_template_kwargs.enable_thinking. - Click the
+button to register the attribute into the configuration. Individual attributes can be deleted at any time by clicking their respective trash can icons.
-
Agent Mode: Select Supports agent mode or Does not support agent mode depending on the local model's function-calling capabilities.
4 Click ADD button to finalize and store the newly created configuration.
Editing and Managing Configurations
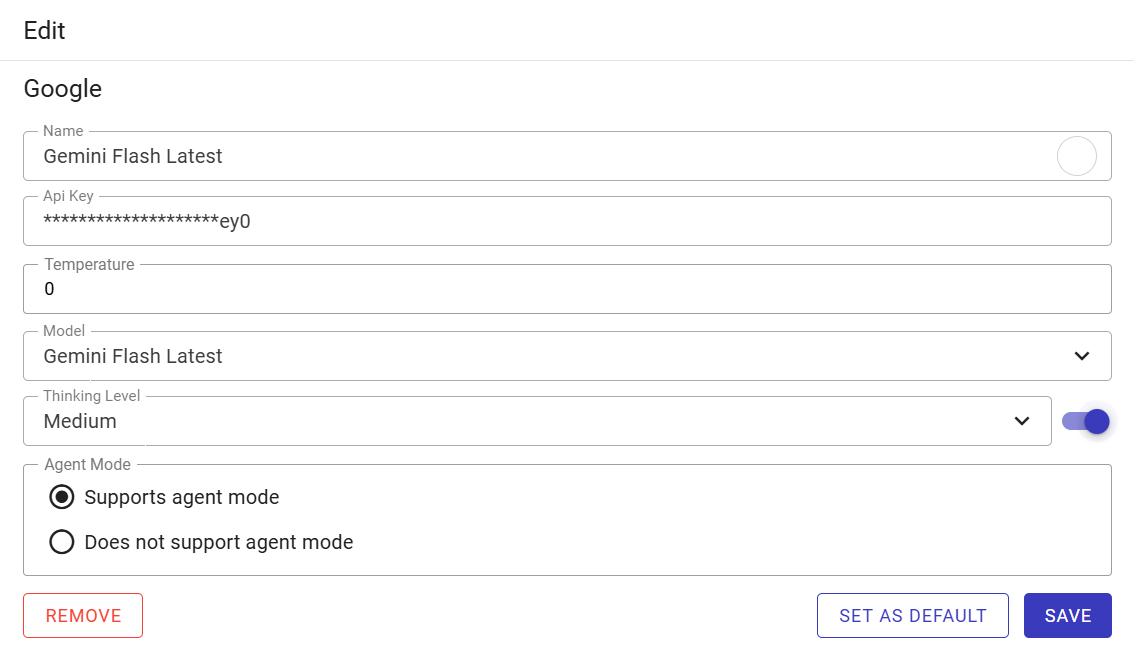
Once a configuration is added, it will appear in the left-hand configuration list. Selecting any model from the list opens its parameters in the Edit pane:
1 Select the target model from the list on the left.
2 Update parameters, API keys, or custom attributes as needed.
3 Use the action buttons at the bottom of the pane to manage the configuration:
-
SAVE: Saves changes made to the selected configuration.
-
SET AS DEFAULT: Designates the selected configuration as the global default LLM across TURBOARD for all JAS queries and background smart descriptions. The active default configuration is marked with a black indicator circle in the left-hand menu.
-
REMOVE: Deletes the configuration from the system.
GenAI Personas
Administrators can establish a globally defined repository of AI Personas that govern the narrative tone, analytical depth, and presentation structure of JAS explanations. By creating tailored personas (such as Action-Oriented Manager, Strategic Executive, CFO for Planning, or Domain Specialist), JAS can interpret business intelligence visualizations from distinct perspectives without altering the underlying datasets.
Adding a New GenAI Persona
1 Go to Administration > JAS > GenAI Personas.
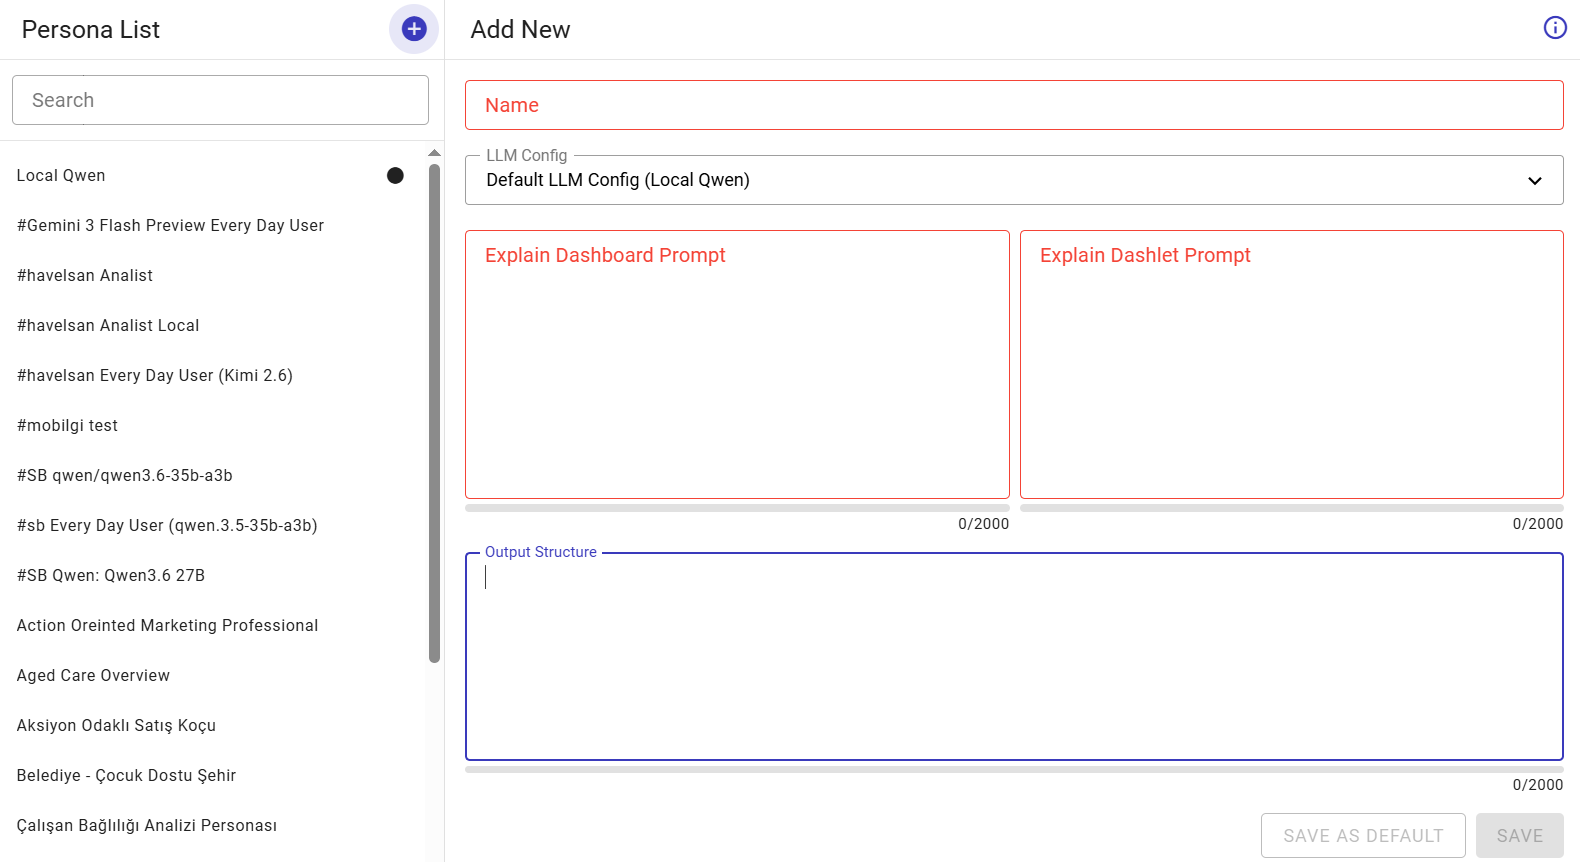
2 Click the + icon button (Add new persona) located at the top-right of the Persona List.
3 In the Add New pane on the right, configure the persona settings and prompts:
-
Name: Enter a clear display title for the persona (e.g.,
Aged Care Overview,Strict Financial Controller). This is the exact label shown to designers and end-users. -
LLM Config: Select the underlying model configuration that powers this specific persona from the drop-down menu.
Note
The options available in the LLM Config drop-down list are pre-defined and populated directly from the configurations added in the LLM Settings administration page.
-
Explain Dashboard Prompt: Enter the system instructions used when the AI analyzes an entire dashboard. Specify the persona's role, analytical objectives, metrics to focus on, and tone of voice.
-
Explain Dashlet Prompt: Enter the instructions used when the persona analyzes a single, isolated visualization (chart, table, or gauge).
-
Output Structure (Optional): Define the visual layout and the strict order of information for the generated narrative. If left empty, JAS will output standard plain text (simple paragraphs and bullet points). Filling this field allows you to enforce the exact sequence of data presentation along with special formatting, such as custom data blocks, styled labels, specific color schemes, and unique card designs. To create a custom layout, this field supports a combination of three structural components:
- Formatting Directives: Plain-text rules at the very top that enforce language, number conventions (e.g., decimal formats), and length constraints (e.g.,
HEADLINE=Main Title, max 10 words). - HTML & CSS Template: Standard HTML elements combined with inline styles or
<style>blocks to define cards, grids, flex layouts, font sizes, and container colors. - Dynamic Mustache Tags: Variable placeholders (e.g.,
{{PERIOD}},{{HEADLINE}},{{KPI_1}},{{ACTION_ITEM}}) inserted inside the HTML structure. JAS generates analytical values matching the directives and renders them directly into these placeholders in your specified order.
- Formatting Directives: Plain-text rules at the very top that enforce language, number conventions (e.g., decimal formats), and length constraints (e.g.,
See below the visual difference between leaving the Output Structure empty for standard plain text versus applying a custom HTML/CSS template to dictate the layout, colors, and order of information.
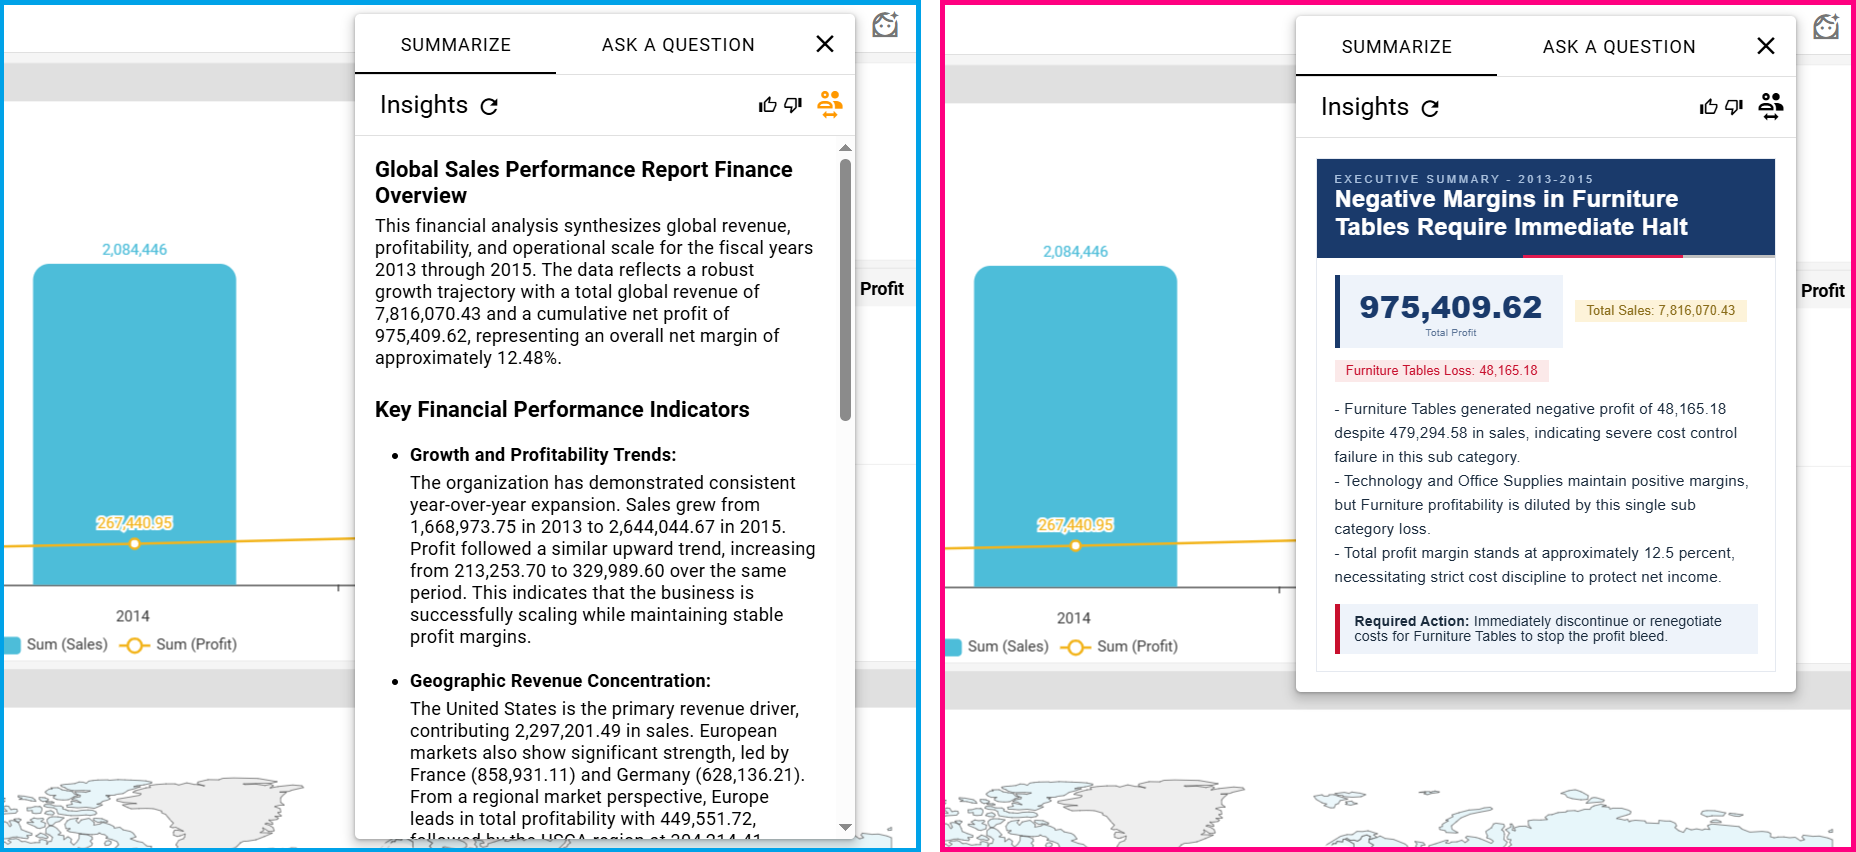
4 Click SAVE button to store the persona, or click SAVE AS DEFAULT button to designate it as the default persona applied when no specific persona is selected.
Editing and Managing Personas
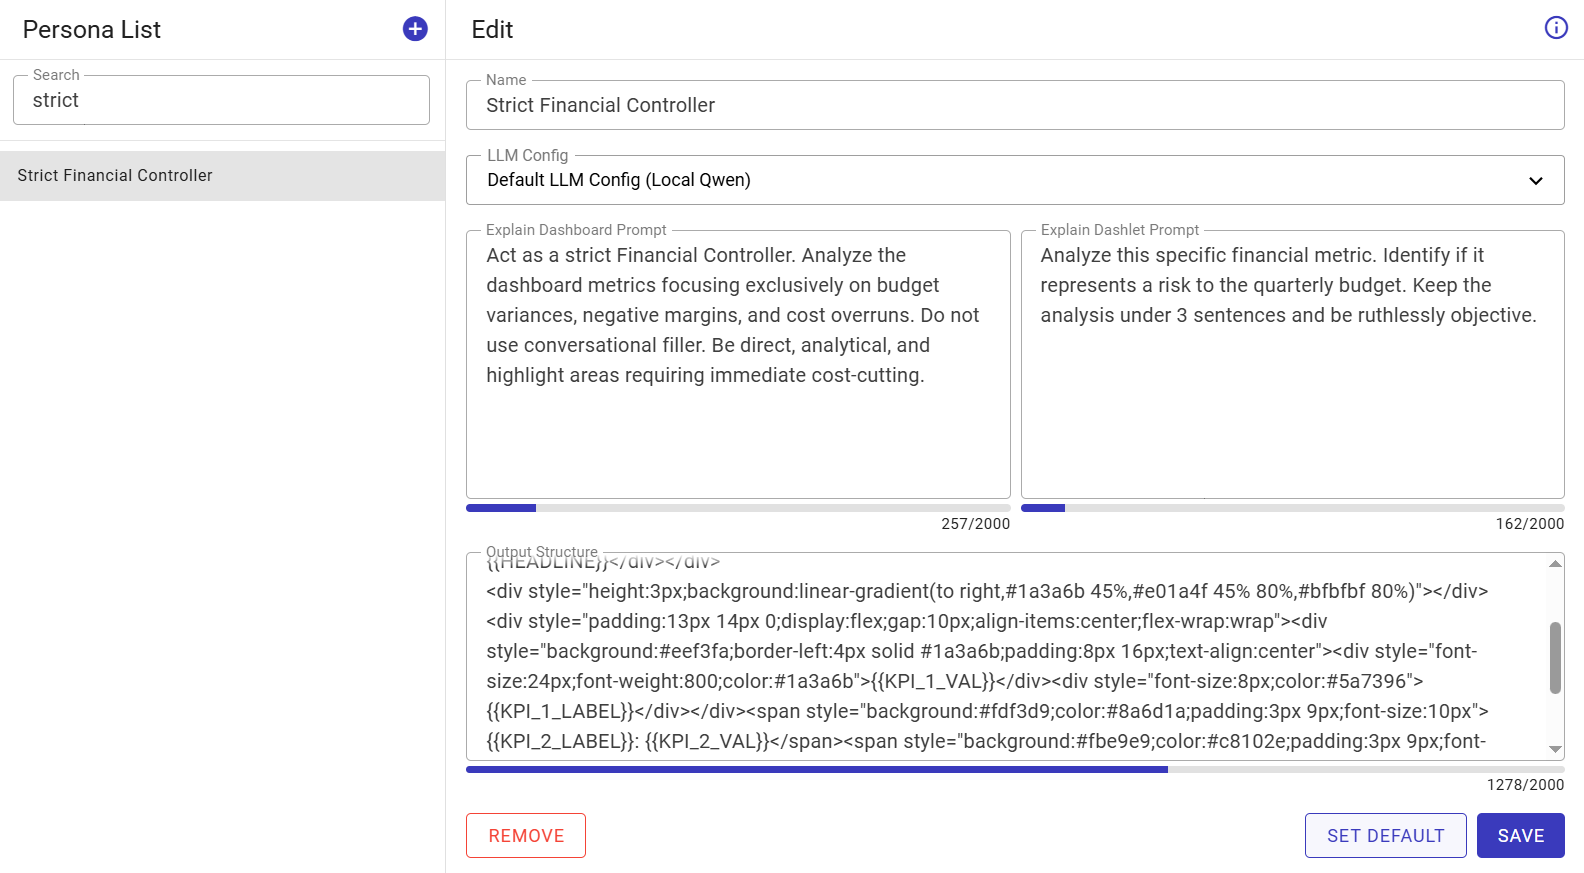
All registered personas are cataloged in the Persona List on the left.
1 Select the persona from the list or use the Search field to locate it.
2 In the Edit pane on the right, update the persona name, assigned LLM configuration, prompts, or output template as needed.
3 Use the action buttons at the bottom of the pane to manage the entry:
-
SAVE: Saves changes made to the selected persona.
-
SET DEFAULT: Designates this persona as the global fallback default across the platform.
-
REMOVE: Permanently deletes the persona from the system.
Note
System Integration & End-User Experience:
Once personas are defined in this administration panel, they become available across the platform:
Designer Interface: Dashboard designers can curate and restrict which personas are accessible on specific dashboards. See the Dashboard Settings & Configuration Panel section to learn more.
End-User Interface: Curated personas appear directly inside the JAS Explain drop-down menu on dashboard ribbons and dashlet menus, allowing end-users to generate tailored narratives on demand. See the Dashboard Quick Actions Ribbon section to learn more.
Context Refreshing
JAS relies on descriptions of your data to answer questions accurately. TURBOARD can automatically generate smart descriptions for Data Source Tables, View Nodes, Dashlets, Dashboards, and Showcases using RAG (Retrieval-Augmented Generation) technology, analyzing each element shortly after creation and populating its description field to build a knowledge base that makes subsequent JAS queries faster and more accurate. Administrators can supplement these with manually written descriptions for Nodes and Expressions, and can use the “Context Refreshing” page to schedule recurring automated updates to JAS’s knowledge base so that its understanding of the data stays current without manual intervention.
Adding a New Refresh Schedule
1 Go to Administration > JAS > Context Refreshing.
2 Click the + icon button located at the top-right of the schedules list.
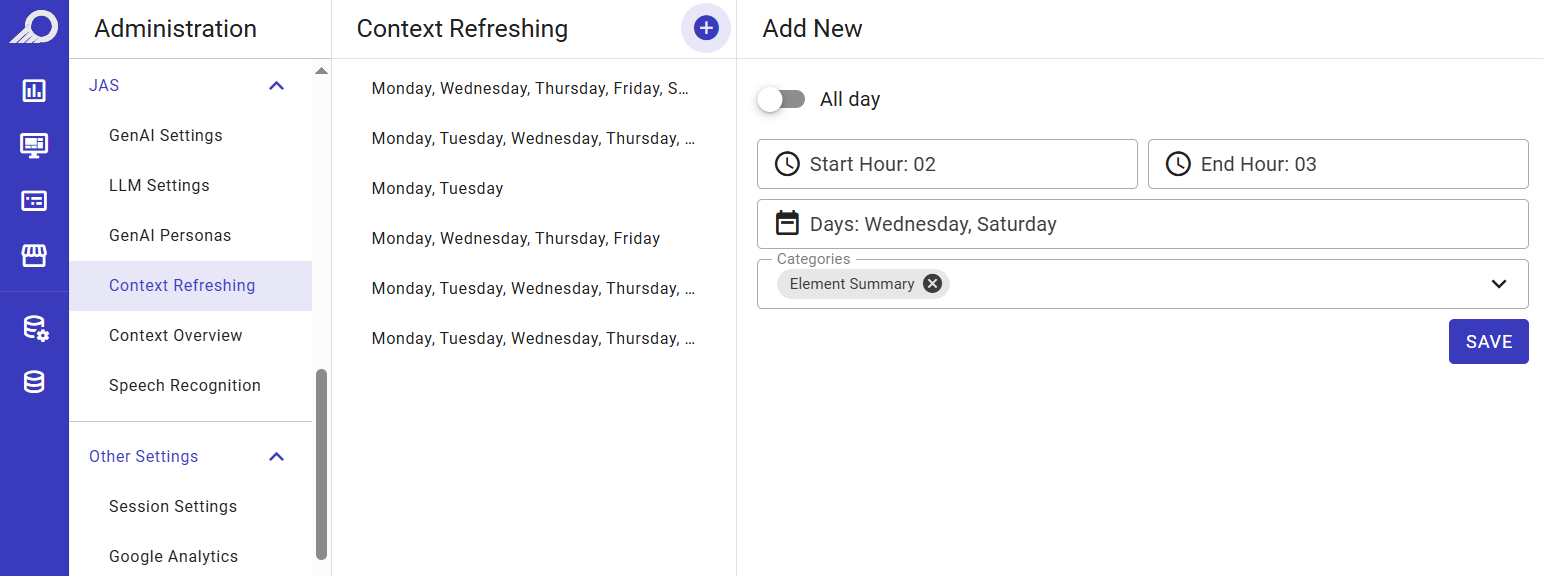
3 In the Add New pane on the right, configure the timing and scope of the background refresh:
- All day: Toggle this switch to allow the system to run the refresh tasks continuously throughout the selected days.
-
Start Hour & End Hour: If the All day toggle is disabled, specify a dedicated time window for the refresh process using the drop-down selectors (e.g.,
Start Hour: 00andEnd Hour: 06).Note
It is highly recommended to schedule context refreshing during off-peak hours (e.g., midnight to early morning) to prevent heavy AI processing tasks from consuming system resources during active business hours.
-
Days: Click the field to open the drop-down checklist and select the specific days of the week when the schedule should run. At least one day must be selected.
- Categories: Click the drop-down menu to select which specific metadata categories should be updated.
- Element Summary: Refreshes the automatically generated summaries for all elements. Each summary provides key findings and descriptions that reflect the latest state of dashlets, dashboards, showcases, and views.
4 Click SAVE button to store and activate the schedule.
Editing and Managing Schedules
Once created, all refresh schedules appear in the left-hand list panel based on their configured days.
1 Select the target schedule from the list on the left to open its configuration in the Edit pane.
2 Modify the operating hours, active days, or metadata categories as needed.
3 Use the action buttons at the bottom of the pane to manage the entry:
- SAVE: Saves and applies changes made to the schedule.
- REMOVE: Permanently deletes the schedule from the system.
Context Overview
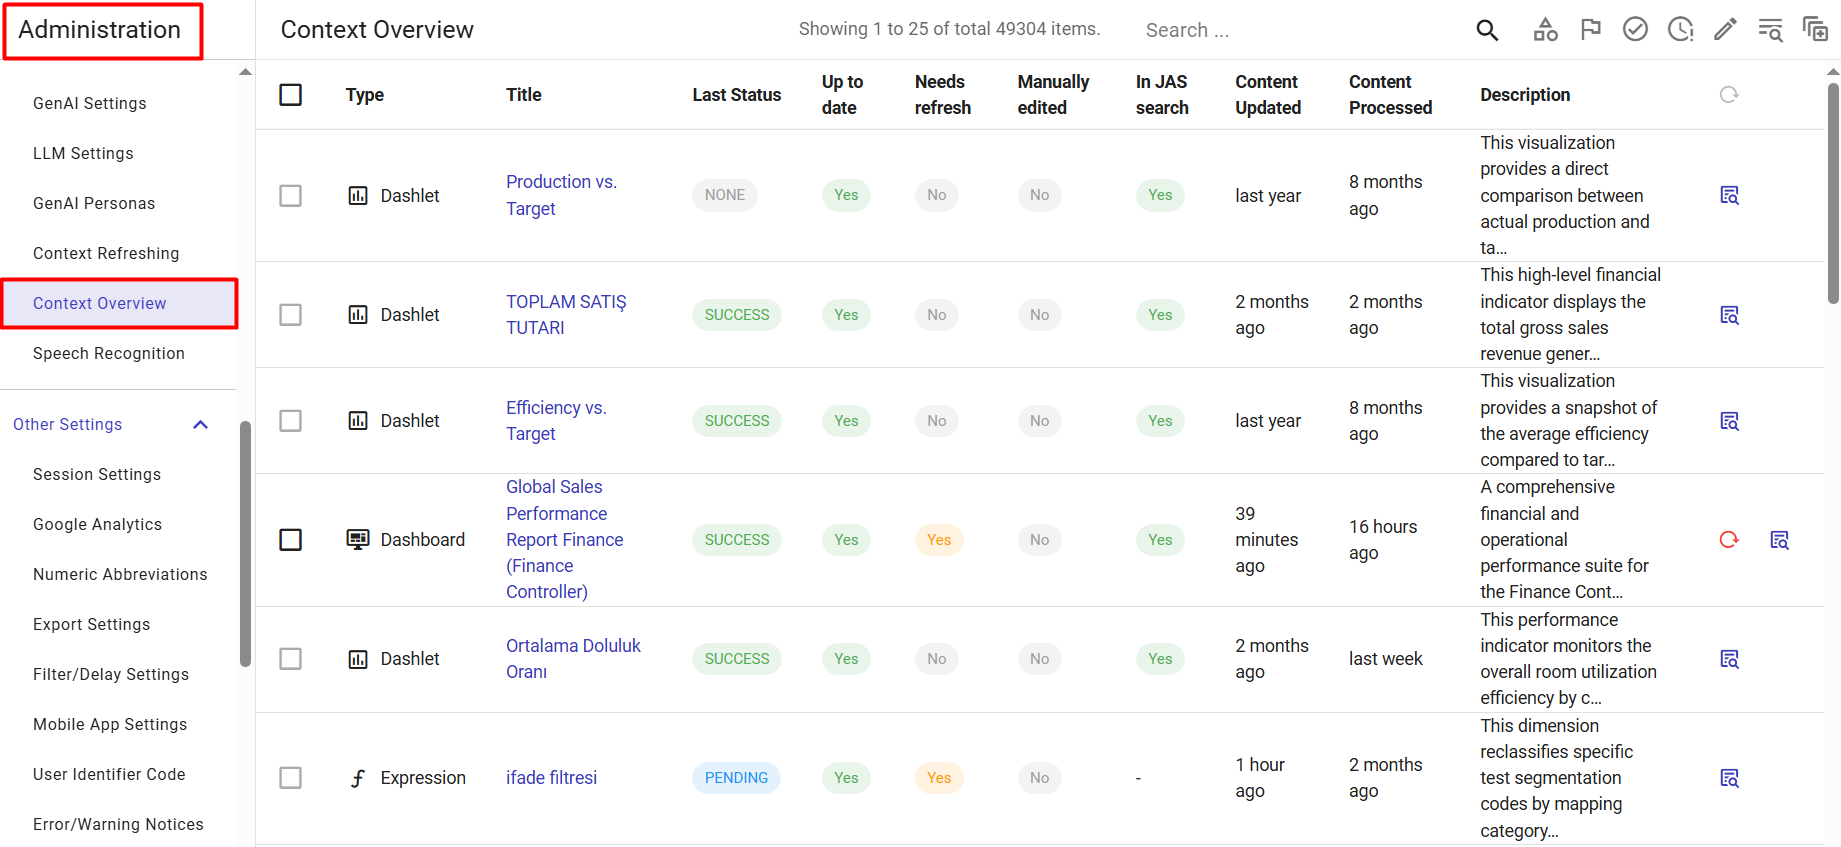
The Context Overview page acts as the central monitoring and auditing dashboard for TURBOARD's RAG (Retrieval-Augmented Generation) knowledge base. While the Context Refreshing page handles automated schedules, this overview provides a comprehensive, tabular inventory of all system elements (Dashlets, Dashboards, Showcases, Views, and Expressions) and their current metadata status.
Administrators use this screen to track which elements have successfully generated AI summaries, which are pending, and which require manual intervention to ensure JAS provides the most accurate answers possible.
Understanding the Context Grid
When navigating to this page, the main grid displays the structural health of your JAS knowledge base:
- Type & Title: Identifies the system element and its given name.
- Last Status: The operational status of the AI generation process (e.g.,
SUCCESS,PENDING,NONE,FAILED). - Up to date & Needs refresh: Indicates if the element has been structurally modified or updated since its last AI summary generation, flagging it for a refresh.
- Manually edited: Shows
Yesif a human administrator has overridden the auto-generated description with manual text. - In JAS search: Confirms whether this element's context is actively indexed and being used by JAS to answer end-user queries.
- Content Updated & Processed: Timestamps indicating when the element was last modified and when JAS last processed its metadata.
- Description: A preview snippet of the actual generated or manual text.
- Action Icons: The far-right column contains specific tools for manual context management (Refresh context and Show context details).
Filtering and Auditing Context
To easily audit thousands of items, the top-right toolbar provides a suite of targeted filtering tools designed specifically for RAG management:
- Search (Magnifying Glass): Search for specific elements by their title.
- Browse by entity type (Shapes icon): Filter the list to show only specific categories, such as isolating only Dashboards or only Views.
- Browse by last status (Flag icon): Filter the list to find elements where the AI generation failed or is currently pending.
- Browse by up-to-date state (Checkmark icon): Quickly isolate elements whose descriptions are lagging behind the current data structure.
- Browse by manually edited state (Clock icon): Audit all custom, human-authored descriptions.
- Browse by JAS search inclusion (Pencil icon): Filter by elements that are actively included or excluded from the JAS search index.
- Include all entities (List icon): A toggle to reveal raw entities that have not yet been processed by the RAG pipeline or lack a RAG record entirely.
Manually Managing Descriptions & Context Details
While AI handles the bulk of the work, administrators can manually intervene on specific elements directly from this grid to refine JAS's understanding.
1 Go to Administration > JAS > Context Overview.
2 Use the top-right toolbar filters to locate the specific element requiring attention.
3 To force an immediate AI update for an outdated item, click the Refresh context icon (circular arrow) located at the far right of its row.
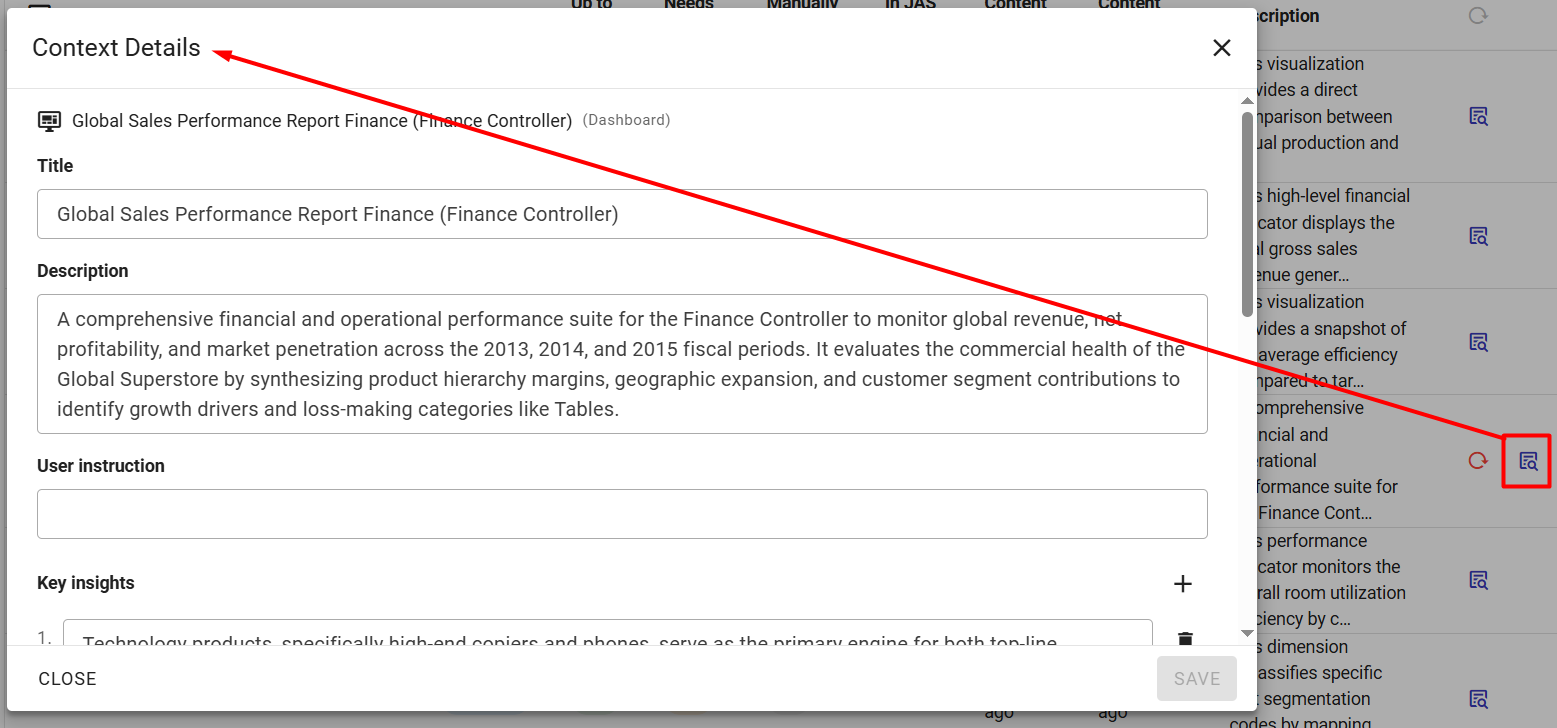
4 To view, write, or fix the AI's metadata, click the Show context details icon (document with magnifying glass) at the far right of the row. This opens the Context Details modal, containing the following editable fields:
- Title: The display name of the element.
- Description: The core narrative summary of what the element represents. You can manually overwrite the AI-generated text here.
- User instruction: Specific behavioral directives for JAS when it analyzes this exact element.
- Key insights: A managed list of discrete analytical findings. Use the
+icon to add new insights or the trash icon to remove irrelevant ones. - Possible questions: A curated list of natural language queries that end-users are likely to ask regarding this element.
- Tags: Semantic keywords associated with the element to improve JAS's retrieval accuracy.
5 Click SAVE to apply any manual modifications.
Speech Recognition
The Speech Recognition page allows administrators to configure the voice-to-text capabilities of the JAS assistant. By enabling this feature, end-users can interact with dashboards and generate analytical prompts using their voice instead of typing. Administrators can choose between a zero-configuration local browser model or route the audio to a custom, external speech-to-text service.
Activating and Configuring Speech Recognition
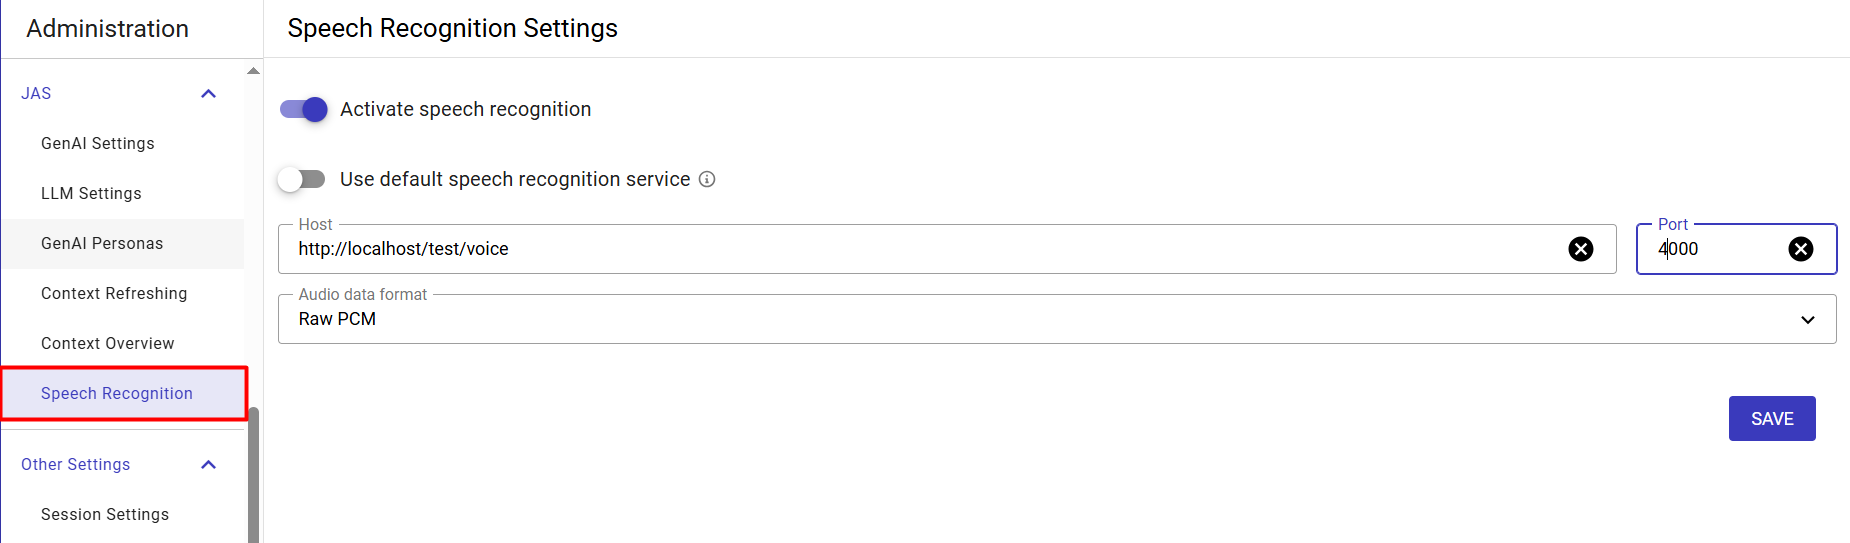
1 Go to Administration > JAS > Speech Recognition.
2 Toggle the Activate speech recognition switch to the ON position to enable the feature and reveal the configuration options.
3 Configure the underlying speech recognition service:
-
Use default speech recognition service:
- When enabled (ON): TURBOARD utilizes a built-in, local speech-to-text model. This default service runs entirely locally within the user's browser, downloading the necessary model data and storing it in the browser's cache storage. This provides a fast, secure, and privacy-focused voice experience without sending audio data to external servers.
- When disabled (OFF): Administrators can connect JAS to a custom, external speech recognition server or a locally hosted backend model.
4 If connecting to a custom service (the default service is toggled OFF), provide the necessary endpoint details:
- Host: Enter the URL or IP address of the external speech recognition endpoint (e.g.,
http://localhost/test/voice). - Port: Specify the communication port for the custom service (e.g.,
5000). - Audio data format: Select the specific audio format required by your external service from the drop-down menu (e.g.,
Raw PCM).
5 Click SAVE button to apply and activate the speech recognition settings.