Embedding Visualizations
What is TURBOARD Embedded Visualization?
Sharing TURBOARD Visualizations in Embedded Environment
In Business Intelligence, effectively conveying data insights and ensuring timely data interpretation are paramount. Recognizing certain use cases where visual insights need to be accessed directly from platforms other than a primary business intelligence tool, TURBOARD offers a feature for seamless visualization embedding.
This feature enables users to embed visualizations in view mode – be they dashlets, dashboards, or showcases – into an iFrame, utilizing REST API technology. Your end-users (or viewer users) can intuitively access and engage with these visualizations right within your platform, eliminating the need to navigate or redirect to TURBOARD platform.
Configuration and Compatibility
Note that embedded visualizations display data in alignment with their specific settings, such as refresh time, cache settings, applied filters, and data source connection configurations, mirroring their configuration in TURBOARD platform.
User-specific functionalities, such as exporting, altering chart types, and viewing data in detailed tables, hinge upon permissions set by the TURBOARD platform's admin and designer users.
Moreover, when accessed from mobile devices, TURBOARD's mobile-compatible design ensures that embedded visualizations adapt appropriately to the device's dimensions.
How is it Different from the EMB-S Module?
It's essential to distinguish this feature from the EMB-S add-on module. While the EMB-S module facilitates the comprehensive integration of TURBOARD – with its vast design features and administrative interfaces – into a client's platform and offers rebranding (white labeling) capabilities, the visualization embedding focuses exclusively on integrating individual visual elements.
This is particularly beneficial when the objective is to share targeted data insights or visual reports with your end-users without tapping into TURBOARD's broader functionalities.
Why Embedded Visualizations Feature?
Sharing a dashlet, dashboard or a showcase within your website or application offers the following benefits:
-
Easy Access: Users can see important data visualizations directly in the app or webpage they use most often, without switching between different platforms.
-
Selective Sharing: You can share specific insights without showing all of TURBOARD's features and screens to the targeted users.
-
Consistent Branding for Public Visualizations: By embedding visualizations within your domain, you maintain a uniform user experience and uphold your brand's identity. This is especially useful when sharing public visualizations with a wider audience.
-
Better Engagement: Visualizations that are directly part of your content can lead to more user interactions, as they blend in more naturally.
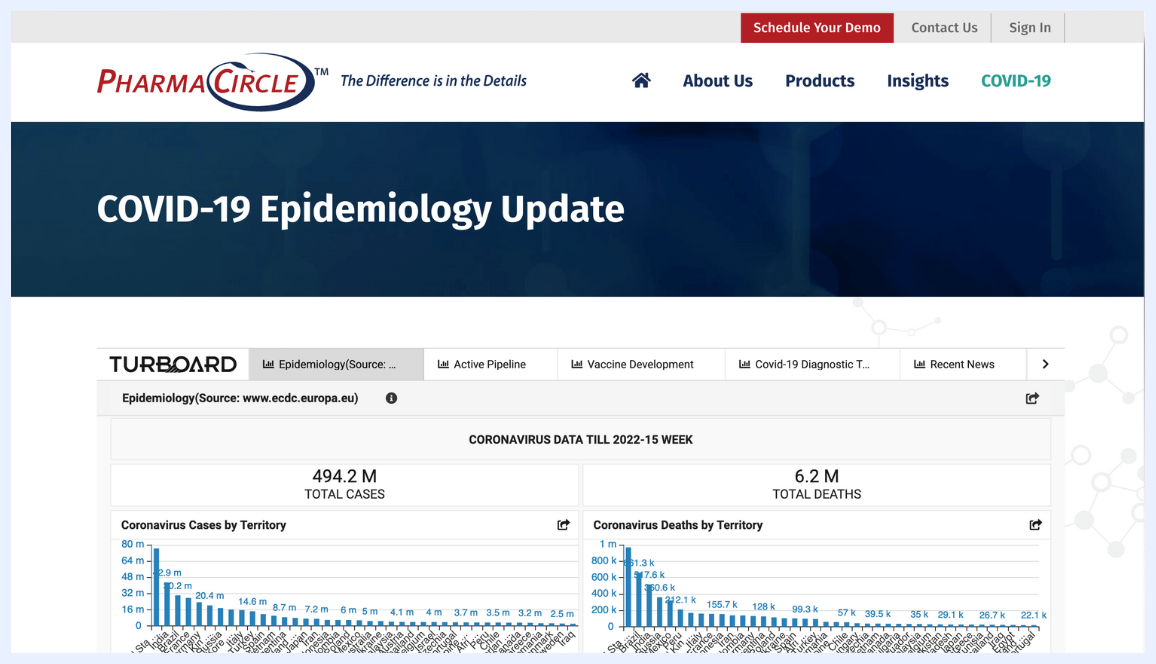
Sample of an Embedded Public-access Dashboard on a Client’s Website
Embedding and Sharing Types
Publicly Accessible Embedded Visualizations
Publicly accessible embedded visualizations in TURBOARD are designed to disseminate insights and dashboards via the external platform without the need for individual user authentication.
This feature allows you to share valuable data-driven narratives in a universal format, making it ideal for general reports, public dashboards, or broad communications where specific user permissions are not required.
The simplicity of embedding a visualization with a 'Public Access' URL, making it readily accessible to a wider audience, enhances the reach of your data, ensuring that stakeholders, clients, or the general public can interact with your insights seamlessly.
User-based Authorized Embedded Visualizations
User-based authorized embedded visualizations elevate the security and specificity of data access within TURBOARD. Tailored for environments where data sensitivity and user-specific insights are paramount, this embedding type ensures that each visualization is not just a window to data but a portal to personalized, role-based analytics.
By leveraging user-based authorization, you embed not just a visualization but a dynamic, context-aware experience that aligns with the viewer's permissions, roles, or data access levels within TURBOARD.
This approach is crucial for maintaining data governance, ensuring compliance, and delivering personalized dashboards or analytical insights. It's especially beneficial in corporate environments, client-specific portals, or any scenario where data relevance and security are as important as the insights themselves.
With user-based authorized embedding, you transform your data visualizations into intelligent, interactive, and individualized analytical experiences. This fosters a deeper, more secure, and highly relevant data interaction for each user. Moreover, it maintains the flexibility to display these tailored visualizations on external platforms, apps, or websites, seamlessly extending the power of TURBOARD beyond its native environment.
Pre-embedding Checklist
Before Embedding Your Dashlet, Dashboard, or Showcase:
-
Ensure Connectivity: Make certain that the device or system where you plan to embed TURBOARD has an active connection to the server or machine where TURBOARD is installed.
-
Verify TURBOARD User Permissions: Only TURBOARD admin or designer users (like data scientists) with the appropriate permissions should proceed with embedding. If you're not one of these users or unsure about your permissions, check with your TURBOARD administrator.
-
Check iFrame Compatibility: Ensure that the platform or environment into which you're embedding TURBOARD supports the HTML iFrame component. If unsure, consult with your technical team or web developer.
-
Generate ‘Public Access’ URL in TURBOARD: When embedding a visualization in TRBOARD into another platform, webpage or app, you need the URL of this visualization – whether it will be shared for public view, or with authorized users only, as it will b embedded within an iFrame. Follow the below steps to generate and acquire the URL required for embedding:
-
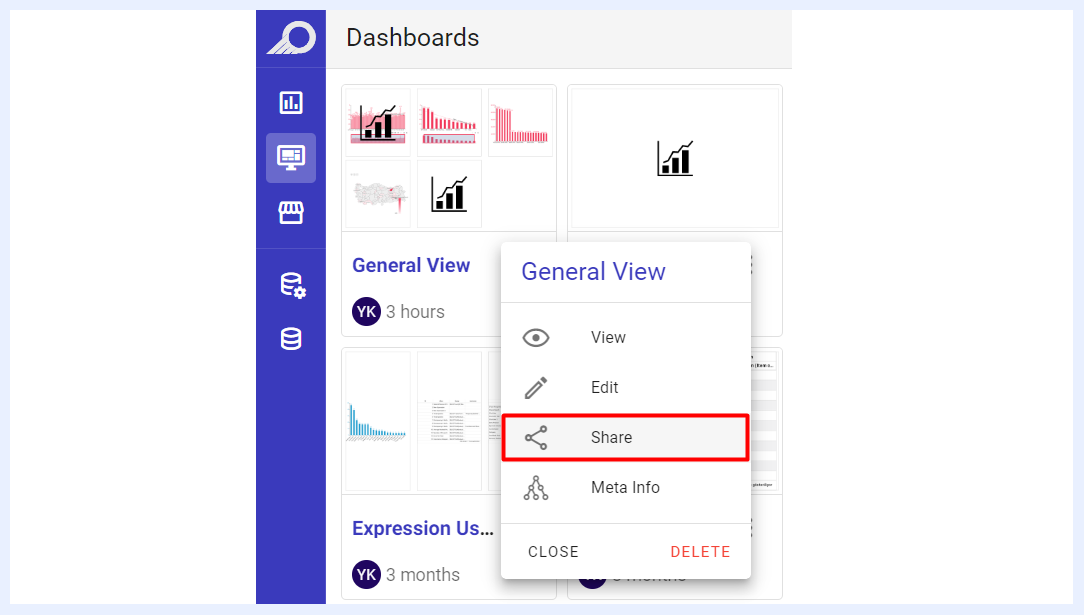
In TURBOARD platform, navigate to the dashlet, dashboard, or showcase you wish to embed. Click on the ellipsis menu (three dots) associated with the visualization and select the “Share” option.
-
A “Share” pop-up window will appear. Ensure you tick the “Public Access” checkbox.
-
Once this is done, a unique URL for public access will be generated.
-
Copy or save this URL as you will add it as part of the HTML scripts inside the target platform, webpage or app.
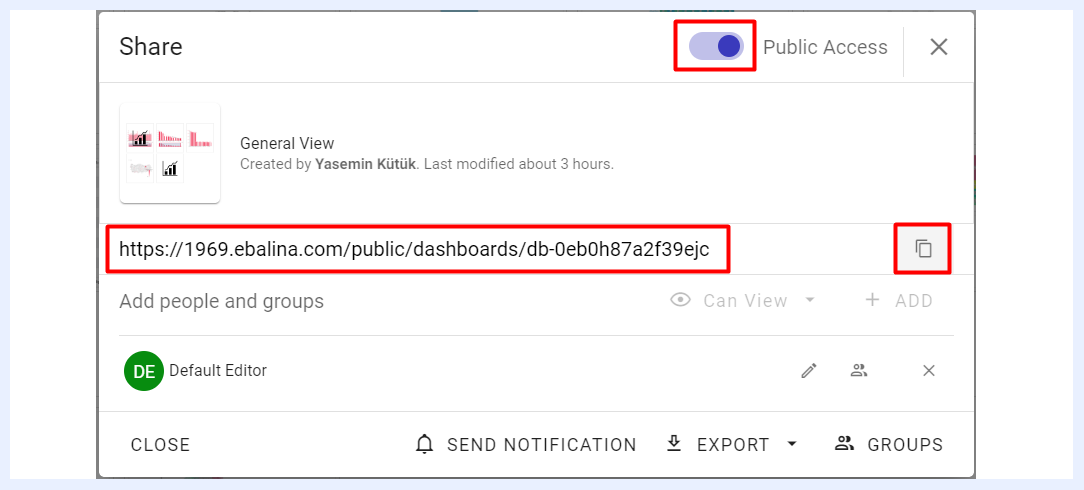
Sharing Publicly Accessible Embedded Visualizations
To embed the visualization on a webpage or app, follow the below steps:
1 Prepare the iFrame HTML element where the visualization will be added. Here's a generic representation of how it might look:
| Sample iFrame Element | |
|---|---|
| iFrame Code: | <iframe src="PASTE_THE_COPIED_URL_HERE" width="YOUR_DESIRED_WIDTH" height="YOUR_DESIRED_HEIGHT"></iframe> |
2 Replace ‘PASTE_THE_COPIED_URL_HERE’ with the URL you obtained from TURBOARD public access URL in the “Share” pop-up window.
3 Once your iFrame is ready, paste it within the HTML where you want it to appear on your webpage or app.
Sharing User-based Authorized Embedded Visualizations
Before Starting
-
Ensure your TURBOARD server is configured to whitelist your host to prevent Cross-Site Scripting (XSS) errors. This setting is critical to allow embedding from your domain.
-
Access Your Server Settings: Log in to your TURBOARD server and navigate to the security or network settings. This might require administrative privileges.
-
Locate Whitelist Settings: Find the section for CORS (Cross-Origin Resource Sharing) settings or a similar section where you can specify trusted domains.
-
Add Your Domain to the Whitelist: Enter your domain or the specific URLs from which you'll embed TURBOARD visualizations. Ensure the correct protocols (http or https) are used.
-
Save and Test: After adding your domain to the whitelist, save your changes and conduct a test to ensure that your domain can successfully request and receive data from TURBOARD.
-
Seek Consultation if Needed: Consult your TURBOARD server documentation or technical support for detailed instructions, as interfaces and steps may vary based on the server configuration.
Make sure that only authorized TURBOARD admin or designer users perform this operation. Limit knowledge of the auth_key to a few trusted individuals and change it if necessary for security.
Creating a Unique Access Token
To generate an access token, use the following URL format: http(s)://[server address]/api/v1/usertoken/[Element URL]. This token serves as a unique identifier and authentication for secure, user-specific sharing.
Parameters for Token Generation:
- Username and Password: If you have the user's username and password, you can generate a token using these credentials.
Alternatively,
-
Auth Key: You can use an auth_key, generated within TURBOARD, to establish a secure connection between your application server and TURBOARD. This provides flexibility in token generation based on the chosen parameter (password or auth-key).
-
Script Structure and Execution: The method of making an HTTP POST request to the TURBOARD API with the appropriate parameters and handling the response depends on your website, app, or platform's programming language, as well as the chosen parameter (password or auth-key). Sample scripts and instructions for implementation are provided in the following section.
Sample Scripts for Creating the Access Token
- Access Token Generated Using Password:
The samples below clarify token generation using username and password parameters, noting that the logic can be translated to other languages based on your platform and requirements.
| Sample PowerShell Script | |
|---|---|
| PowerShell: | curl.exe -X POST -F 'username=YOUR_USERNAME' -F 'password=YOUR_PASSWORD' YOUR_SERVER_ADDRESS/api/v1/usertoken/ |
| Sample Bash Script | |
|---|---|
| Bash: | curl -X POST -F 'username=YOUR_USERNAME' -F 'password=YOUR_PASSWORD' YOUR_SERVER_ADDRESS/api/v1/usertoken/ |
| Sample PHP Script | |
|---|---|
| PHP: | <?php $host = 'YOUR_SERVER_ADDRESS/api/v1/usertoken/'; $ch = curl_init(); curl_setopt($ch, CURLOPT_URL, $host); curl_setopt($ch, CURLOPT_POST, 1); curl_setopt($ch, CURLOPT_POSTFIELDS, "username=YOUR_USERNAME&password=YOUR_PASSWORD"); curl_setopt($ch, CURLOPT_RETURNTRANSFER, true); $response = curl_exec($ch); $err = curl_error($ch); curl_close($ch); if ($err) { echo "cURL Error #:" . $err; } else { echo $response; } ?> |
- Access Token Generated Using auth-key:
The samples below clarify token generation using auth_key parameter, noting that the logic can be translated to other languages based on your platform and requirements.
| Sample PowerShell Script (Auth Key) | |
|---|---|
| PowerShell: | curl.exe -X POST -F 'username=YOUR_USERNAME' -F 'auth_key=YOUR_AUTH_KEY' YOUR_SERVER_ADDRESS/api/v1/usertoken/ |
| Sample Terminal / Bash Script (Auth Key) | |
|---|---|
| Terminal / Bash: | curl -X POST -F 'username=YOUR_USERNAME' -F 'auth_key=YOUR_AUTH_KEY' YOUR_SERVER_ADDRESS/api/v1/usertoken/ |
| Sample PHP Script (Auth Key) | |
|---|---|
| PHP: | <?php $host = 'YOUR_SERVER_ADDRESS/api/v1/usertoken/'; $ch = curl_init(); curl_setopt($ch, CURLOPT_URL, $host); curl_setopt($ch, CURLOPT_POST, 1); curl_setopt($ch, CURLOPT_POSTFIELDS, "username=YOUR_USERNAME&auth_key=YOUR_AUTH_KEY"); curl_setopt($ch, CURLOPT_RETURNTRANSFER, true); $response = curl_exec($ch); $err = curl_error($ch); curl_close($ch); if ($err) { echo "cURL Error #:" . $err; } else { echo $response; } ?> |
1. Placement of the Script:
Place your script in the server-side code, ensuring it's executed before the page renders. If you are working on a .php file, for example, this is typically at the beginning of your PHP file, before any HTML output.
2. Embedding the Visualization with the Token:
Follow the provided instructions for embedding the visualization using the iFrame element, ensuring the generated token is included in the URL.
You may follow the below sample script structure, and replace the placeholders with your actual data and add your designs elements as desired:
| Sample iFrame Script Structure | |
|---|---|
| iFrame Code: | <iframe id="uniqueId" src="YOUR_ELEMENT_URL?token=<?php echo $token; ?>"></iframe> |
Replace 'YOUR_ELEMENT_URL' with the specific public access URL.
Once your iFrame is ready, paste it within the HTML where you want it to appear on your webpage or app.